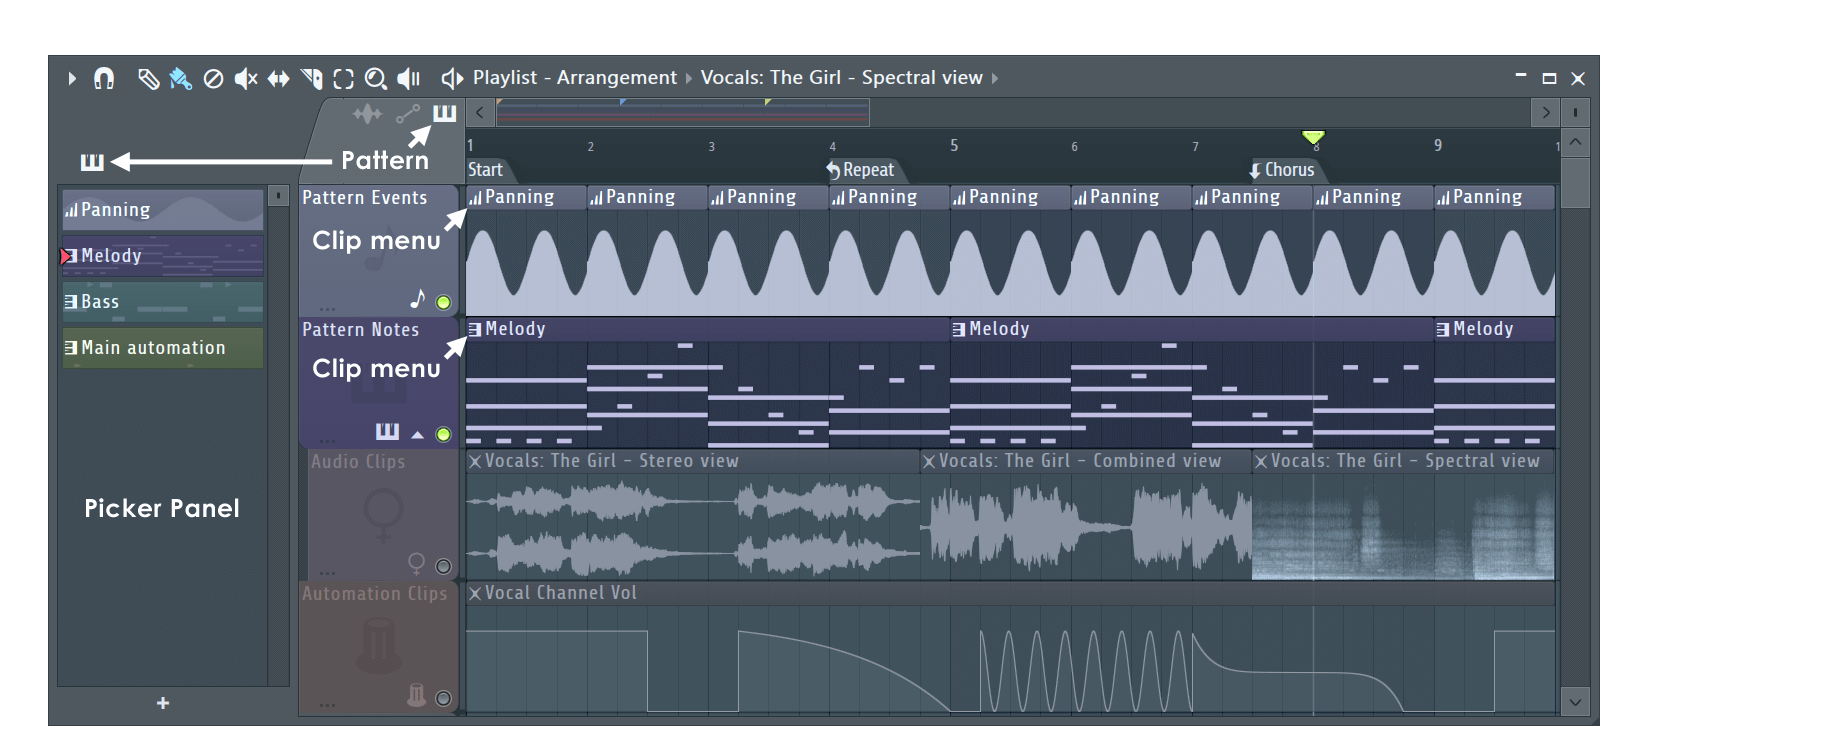
PLAYLIST
Patterns
Patterns can contain note and/or event automation data. Patterns can be placed in the Playlist as either Pattern Clips or
Pattern Blocks. Pattern Clips & Blocks contain instances of the same pattern data, the lower Block Track area is provided mainly for backward compatibility with older FL Studio projects. The names for
Pattern Clips are displayed in the title bar of the clip, while the name of Pattern Blocks are displayed down the left-hand side of the Block track area.
Main automation: By default, Pattern Track 9 is named 'Main automation' and is the standard location in which Automation Events are stored.
NOTE: Pattern notes and events can share the same clip, in this case the display will show a layered (combined) view.
Pattern Clips
Pattern Clip Focus
The clip focus selector (shown below) is used to focus various clip types. This is particularly useful when clips are stacked, the focused clip will be brought to the top for
selection and editing. Selecting CTRL+click will focus all clips so they can be moved together.
- Right-click tab - Show Pattern Clip menu.
- Note - Uses the color settings of the parent pattern (notes & event). Note color is set from within the Piano roll. Event data always displays in pink, so anyone uncomfortable about being seen using
pink in the Playlist needs to 'suck it in' and stop being a 'big cry baby' about it. Alternatively, don't use this setting.
- Chan - Uses the color settings of the parent channel. Right-click the channel button and use the color selector on the Channel re-name popup panel.
- Pat - Uses the color settings of the parent pattern.
Working with Pattern Clips
Pattern Clips can be arranged in the same manner as Audio and Automation Clips. These techniques are discussed in the main Playlist section.
Pattern Blocks & Block Tracks
The following information relates to the Pattern Block area in the lower Playlist panel. NOTE: Each Block Track represents a single Pattern and so changes made to Block Track names and colors
will affect any Pattern Clips in the upper Playlist (and visa-versa).
Working with Pattern Blocks
- Insert pattern block - Left-click in the lower Playlist track in draw (
) or paint (
) mode. Paint mode will repeat pattern placement when dragged across bars.
- Delete pattern blocks - Right-click it or use the left mouse button in erase (
) mode.
- Multiple patterns can be run simultaneously. However, if patterns share the same instrument channels there may be note conflicts, particularly in the case of monophonic instruments such as the TS404 Generator.
- Move pattern blocks - Left-click and drag the selected pattern/s horizontally. You cannot adjust pattern block lengths in the Playlist, they are controlled by the length of the note data (Step
sequencer or Piano roll) or automation event data in the pattern.
- Snap settings (
) control how patterns move against the background grid. Set this to 'line' if you want
the patterns to snap to the bar boundaries, or 'none' if you want to freely position patterns. Holding the Alt key while dragging will temporarily disable snapping.
- Overlapping pattern blocks are permitted, however only one instance of each pattern can be played at a time (i.e. each new bar 'cuts' the playback of the previous bar for the same pattern).
- Move Block Tracks up/down - Select the track by clicking on the name, then hold the Alt key and press the up/down arrow on your keyboard.
Menu options
Right click on a Block Track name to open the following menu. This shows the same options as available from the Playlist menu from the Patterns
sub-section: