PIANO ROLL
Piano roll
FL Studio's Piano roll has the well deserved reputation as the best Piano roll in the business. The Piano roll sends note and automation data to plugin instruments associated with the Piano roll's Channel. This process is known as 'sequencing'. There are a number of useful tools to help with complex score editing and other manipulations as described below. Note pitch is displayed on the vertical axis and time on the horizontal axis. This is the exact principle as paper 'Piano rolls' used to automate player-pianos in former times. The resolution of the grid is user-selectable (zoomable) and allows the composition of songs with unlimited complexity. Note data can be entered manually with the editing tools or recorded in from 'live' MIDI controllers, then edited to fix mistakes or make changes.

NOTES: You can click the (Middle-Mouse-Button) and drag in the Piano roll to scroll vertically and horizontally at the same time. To change the selected Note Color (Left-click) the color selector. To set a custom color, (Right-click) it.
Piano roll Basics
- Notes - are displayed as horizontal bars. Slides are shown as horizontal bars with a small triangle drawn in the right side. Preview Channels by Left-clicking the Preview Keyboard keys.
- Pitch - is mapped from bottom (low) to top (high).
- Duration - The horizontal length represents time. The number on the Piano roll's top-ruler are bars (groups of beats).
- Resolution / grid - The smaller grid each bar is divided into are set by the window's snap (
 ) setting. Scroll speed will slow when snap settings other than 'Line' are used. Resolution can also change with Zoom when Snap is set to Line. Selecting Main will use the Global Snap value. Some Global snap settings will also quantize live input recording from a MIDI controller.
- Target Channel - Select a Channel with the drop-down menu, in the title bar, to select for editing. Channels with notes, in the currently selected Pattern, will display a tick. You can roll your mouse-wheel while hovering over the control to show Channels with notes OR hold (Ctrl+Mouse-wheel) to show used and unused Channels.
NOTES:
- Click-and-hold - Beware the 'F10 > General Settings > Click-and-hold functions in piano roll' option on the General settings tab. It's functions include:
- Copy note: Hold on an existing note to copy it.
- Cycle slide/porta - Click and hold when adding a note to cycle through slide & porta event modes.
- Glue notes - Place the cursor between 2 neighbor notes, so the resize cursor appears, then click and hold to glue them.
- Mouse-wheel velocity - Use Mouse-wheel while holding notes to change velocity.
- Mouse-wheel tools - Change tools by holding right click and rolling the wheel.
- Time Markers - When set to type Pattern length (Right-Click a marker) Time Markers will define the length of the currently selected Pattern.
Piano roll Controls
- Toolbar icons - Along the top of the Piano roll window:

Main Menu - Includes: Edit, Tools, View, Snap, Select, Group, Zoom, Time Marker, Clip Source, Performance Mode, playhead and Detach options. 
Tools menu - Riff machine (Alt+E); Quick legato (Ctrl+L); Articulate (Alt+L); Quick quantize (Ctrl+Q); Quick quantize start times (Shift+Q); Quantize (Alt+Q); Quick chop (Ctrl+U); Chop (Alt+U); Glue (Ctrl+G); Arpeggiate (Alt+A); Strum (Alt+S); Flam (Alt+F); Claw machine(Alt+W); Limit (Alt+K); Flip (Alt+Y); Randomize (Alt+R); Scale levels (Alt+X), LFO (Alt+O), Script Piano roll Snap - Snap determines how Notes will move and quantization aligns events relative to the background grid (Hold Alt to temporarily set snap to 'none'). NOTE: There is a Global Snap selector on the Snap Panel. 
Stamp tool - Add predefined chords selected from the menu that opens when this tool is clicked. NOTE: Deselect 'Only one' at the top of the menu to avoid the tool reverting to single note mode after the first stamp. 
Loop switch - See the Channel Rack section on Looping Controls. In this case the Piano roll will show a Marker of type Loop for Channels containing Piano roll notes to indicate the current loop point. 
Draw (P) - Left-click to add a note. Left-click-and-drag to reposition the note before releasing it. Right-Click to delete notes. Right-Click and drag to delete multiple notes. Right-Click and hold on the background to open the slice tool (F10 > General settings > Click and hold functions on). Modifier keys: (Shift) add in stretch mode. (Ctrl) to make a selection. (Alt) to add in Draw mode (pencil) with snap set to 'none'. 
Paint (B) - Paints multiple notes as you drag in lines. You can paint notes above or below existing notes to create chords. Left-click to add a single note. Click-and-drag to add multiple notes. Right-Click notes to delete them. Modifier keys: (Shift) - Monophonic paint allows vertical movement while painting AND replaces existing (or selected) notes to create a monophonic score. Use (Ctrl) to make a selection. 
Paint drum sequencer mode (N) - Similar to the 'Paint' tool above. Adds multiple notes as you drag in lines. Behaviors are fine-tuned to work for drum sequencing in the Piano roll, where you may want to mute/unmute steps. Left-click to add a note. Click-and-drag to paint a line of notes. Left-click on notes to mute/unmute them. Right-Click to delete notes. Right-Click and drag to delete multiple notes. Snap sets the note length. Right-Click and hold on the background to open the slice tool (F10 > General settings > Click and hold functions on). Modifier keys: (Ctrl) to make a selection. (Alt) paint at half the selected snap setting. 
Delete (D) - Click or Click-and-drag to delete notes. Right-Click and hold on the background to open the slice tool (F10 > General settings > Click and hold functions on). Modifier keys: Hold (Ctrl) to make a selection, then press (Delete). 
Mute (T) - Left-click on notes to mute them. Left-click and drag to mute multiple notes. Right-Click to delete notes. Right-Click and hold on the background to open the slice tool (F10 > General settings > Click and hold functions on). Modifier keys: (Ctrl) to make a selection. 
Slice (C) - Left-click and drag vertically to slice through notes. Glue notes by making a selection of touching notes and using the (Ctrl+G) shortcut. Modifier keys: (Shift) slice without dragging. (Ctrl) to make a selection. (Shift+Alt) Slice without dragging and with snap set to 'none'. 
Select (E) - Click notes or Click and drag to make group selections. Modifier keys: (Shift) add to or remove notes from the selection. 
Zoom to selection (Z) - Left-click and drag to zoom to selection. Left-click on background to zoom out. When in other modes use (Ctrl+Right-Click) and drag to make a zoom-to selection. Right-Click again to swap between zoom and unzoomed modes. Right-Click the icon to open a menu of quick zoom options: - Zoom in/ Zoom out (Page up / Page down) - Zoom centers on the Cursor position.
- Quick-zoom 1, 2 & 3 (Shift+1, 2, 3) - Three handy zoom levels.
- Zoom out far (Shift+4) - Minimum horizontal zoom.
- On Selection (Shift+5 - Zoom to time-line selection. The command will be disabled if no time region is selected in the timeline.

Play selected (Y) - Click the notes you want to play. Click and drag to 'scrub' play notes. Modifier keys: (Ctrl) make a selection. 
Play / Pause - Left-click to start/pauses playback. Right-Click (while playing) to stop and return to the last set start position. Right-Click (while stopped) to return the playhead to the start of the Piano roll. NOTE: There is an option on the Right-Click main transport Stop button Remember seek time for the start position to be remembered. - Target Channel - Change instrument channels (of the current pattern) without leaving the Piano roll. Right-Click to open the target Channel instrument's interface.
- Event editor target - Selects the data to be displayed in the integrated event editor. This can include parameters such as note properties (Panning, Velocity, etc.) or automation events.
- Slide & Portamento - These are flags that can be set per-note and work as follows:
-
Portamento Toggle (
 O) - When selected, notes added to the Piano roll will display a 'portamento flag' ( icon). The portamento flag causes a short slide in pitch from the end of one note to the note with the portamento flag. This is a note transition effect. NOTES: 1. these features only work with native FL Studio instruments and not VST instruments. 2. Click-and-hold functions in piano roll - Click and hold when adding a note to cycle through slide, portamento note mode. See General Options settings.
-
Slide Toggle (
 S) - When selected, notes added to the Piano roll become 'slide notes' displaying the slide icon () that causes notes, above or below the slide-note, to slide to the pitch of the slide-note. The slide-time is set by the length of the slide-note.
-
Portamento Toggle (
- Note color / Color group selector - Create note groups for independent editing of overlapping notes categorized by color group.
NOTES:
- MIDI Control - Color groups appear to plugins as separate MIDI channels, so one Piano roll can control several MIDI channels in the associated plugin.
- Recording notes - To record incoming MIDI Channels from a controller or MIDI sequencer to the correct MIDI note colors, Right-Click the instrument's Channel Rack button and activate the 'MIDI channel through' option.
- Color group selection - There is another Note / Clip Grouping function activated from the Toolbar Group Icon, that groups notes by selection. Use the Piano roll menu to group selected notes.
- Customize note colors - Right-click the Note Color selector to change note colors from the defaults.
- Preview keyboard - Click on the keyboard to preview notes. This does not work when play is active. Click here with the (Middle mouse button) and drag vertically to change the vertical zoom centered on the note you click.
- Horizontal & Vertical Zoom controls - To horizontally zoom the Piano roll click on the edge of the horizontal position slider and drag. For the vertical zoom boxes likewise click and drag.
- Ghost notes - These are notes in other Piano rolls associated with the current Pattern. See the Piano roll Menu > View > Ghost channels (Alt+V) option. To edit Ghost notes (Double Right-Click or X1 button) on the notes to switch to the Ghost channel. Piano roll menu > Editable ghosts (Ctrl+Alt+V) - Allows direct interaction with Ghost Notes as per normal notes.
- Event Editor - Edit: Note Velocity, Pan, Pitch, Filter cutoff & Automation events (the lower Piano roll area can display the same data as the Event Editor). Select events to edit from the Target Control selector or Right-Click the area at the front of the editor as shown above.
- Notes - Click/select to drag, stretch, paint, clone, copy, etc. (see 'operating with notes' below). Note colors can have special functions, discussed here.
- Splitter handle - Left-click and drag the divider to resize the upper and lower windows. Right-Click to return to the original position.
Using the Piano roll
FL Studio has, arguably, the most powerful Piano roll editor available. Combined with the Piano roll menu you will find the possibilities are endless and (after practice) effortless.
NOTE: Many of the movement and draw commands are constrained by the snap setting ![]() that controls how notes move relative to the Piano roll grid. Hold the (Alt) key
to temporarily bypass snap. Important also, the Global snap setting can be used for MIDI input quantizing.
that controls how notes move relative to the Piano roll grid. Hold the (Alt) key
to temporarily bypass snap. Important also, the Global snap setting can be used for MIDI input quantizing.
- Tools Menu - () is a shortcut to the Piano roll
tools submenu (see the Piano roll menu page, ),
containing various commands for operating on patterns in the Playlist.
- Adding Notes - draw mode () allows you to draw, edit and delete notes. To add notes and draw the length, hold the (Left-Shift)
Left-click and drag to the desired length. The paint mode () is similar, but allows you to draw
multiple notes at once while dragging horizontally in the Piano roll. Notes are added monophonically (replacing any notes they overlap). Hold (Shift) to bypass monophonic paint mode. In draw or paint mode, Left-click in the Piano roll's grid to draw a note. The default length for notes will be equal to the last touched note.
- Deleting notes - Right-Click a note to erase it (alternatively switch to erase mode to erase with Left-clicks ().
- Selecting/Deselecting groups of notes - There are a number of methods to select several notes, so you can move and resize them all at once:
- Standard selection - Press and hold (Ctrl key) and either click a note to select it, or drag a rectangle to select all notes in enclosed area.
- Magic lasso - The Piano roll Menu > Select > Magic lasso option must be selected. Move your mouse pointer in a loop that encloses the notes you want to select (no clicking required, it's 'magic' remember). Make sure you have no notes selected before you perform the lasso action (Right-Click the empty Piano roll to deselect all notes and make another selection).
- Add notes to selection - Hold (Ctrl+Shift) together while selecting to add notes to the existing selection.
- Selecting notes in a time or pitch range - Time, (Ctrl+Left-click) or double-click the time ruler (along the top of the Piano roll) and drag along it to select all notes in a specified time range. Pitch, (Ctrl+Left-click) the Preview Keyboard to select a range of notes with the same pitch (dragging vertically on the Keyboard will select notes in the vertical pitch range).
- Deselect all notes - While holding (Ctrl key), click empty space in Piano roll's grid.
- Remove notes from selection - (Ctrl+Shift) deselects individual notes from the existing selection of notes.
- Invert selection - Use (Shift+I).
- Select mode button - Instead of holding (Ctrl key), you can also switch Piano roll to select mode by clicking the select mode button ().
- Group notes - (Shift+G) - Group the selected notes. Grouping functions so that an action on any note in the Group will affect all other notes in the same way. Any number of groupings may be created. To group notes: make a selection using the Select tool, then use the Group function. Activate / deactivate grouping: Use the Note / Pattern Grouping switch on the Toolbar icons. Deselecting the Note / Pattern Grouping switch will disable note grouping behavior until the switch is reactivated.
- Copy & Paste - Make a selection (see above), hold the (Shift) button THEN drag selection with the left-mouse button OR (Ctrl+C), scroll to the new position/pattern and (Ctrl+V).
- Duplicate selection - Make a selection and press (Ctrl+B). The selection, or all notes if nothing is selected, will be duplicated to the right of the original selection. To define a specific repeat interval, make a time-line equal to the complete interval to be duplicated and press (Ctrl+B). NOTE: The time-line selection and note selection can be made independently. The repeat interval is set by the time-line selection, the notes duplicated by the note selection. In this way, notes outside the time-line selection can be duplicated according to the time-line interval.
- Moving notes - Select the note/sequence, Left-click on the note and drag vertically or horizontally. NOTES:
- The snap setting will affect the movement.
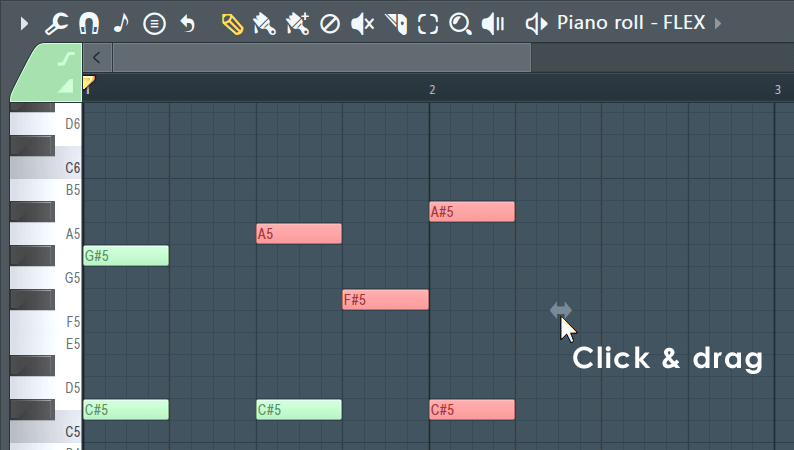
- Horizontal note positions can be adjusted by (Shift + mouse-wheel) by holding the cursor over a target note in the Piano roll.
- (Shift) - Vertical position lock.
- (Ctrl) - Horizontal position lock.
- The snap setting
- Bumping notes - This allows you to move the note/s by either 'snap' or 'pixel' based units. Snap units: Select the sequence/note and hold the (
Shift key) and use the arrow keys on your keyboard. The snap setting will
affect the bump size. Pixel units: Hold the (Alt) key and use the arrow keys on your keyboard. In
this case the zoom setting will affect the bump size.
- Change note length - Select the note/sequence, Left-click on the right side and drag horizontally to change the note
length. This can also be performed on a selection of notes. NOTE: The snap setting
will affect the way in which the note changes length. If (Caps Lock) is on and the note is selected by the left side, resizing notes will
anchor the note end point, moving only the start position. If the note is selected by the right side the start point will be anchored.
- Edit Ghost notes - Use (Double Right-Click or X1 button) on the Ghost notes to switch to the Ghost channel.
- Stretch / compress scores - Select a group of notes and drag the pop-up handle OR hold (Right-Shift) and drag the right edge of a note in the selection. This changes both note length and sequence duration. (Alt + Right-Shift) will stretch in 25% increments.
- Slice Tool - () allows you to split one or more notes in the direction of the cut through the Piano roll. To use the cut
tool, make sure you're in cut mode (the Cut button is selected), Left-click in the grid area and drag to define the "cut line" direction and length. Release the mouse button to split all notes at their
intersection point with the cut line.
- Resize chords & splits - Hold (Left-Shift) click and drag on the slice point or right-side of the chord.
- Playback/Scrub tool - () enables you to preview the current sequence by dragging horizontally in the Piano roll (thus enabling you to define the playback speed and order). Alternatively, hold (Alt) + Right-Click while in draw mode.
- Play notes straddling the playback position marker - When stopping and starting you can play notes that cross the playback position by opening the Audio Options and selecting 'Play truncated notes'.
- Quick chords - Enter chords with one click using the Piano roll Menu > Tools > Stamp Tool . The stamp tool allows you to add chords & note-patterns selected from a menu.
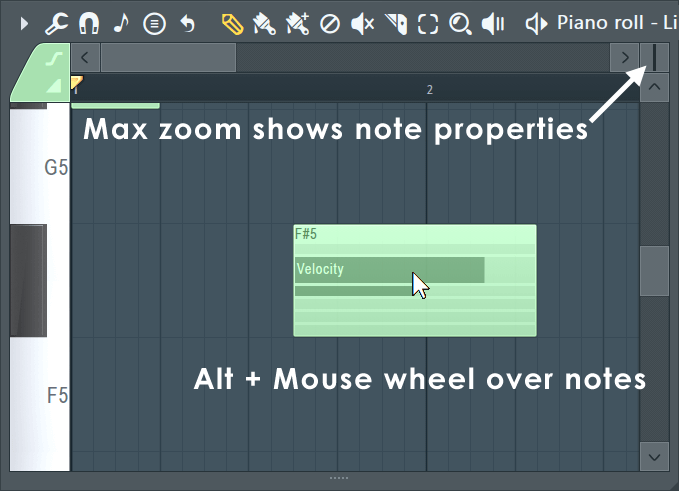
- Note properties - Note velocity, panning, filter-cutoff, etc, are available from the Target control menu and appear in the Piano roll Event Editor. Note properties can be adjusted by mouse-wheel (Alt+mouse-wheel) by holding the cursor over a target note in the 'Note event window'.
- Merging scores across Patterns - Place the Pattern Clips in the Playlist, with the Pattern Clip you want to receive the other scores at the top. Select all the clips to merge then use the Edit > Merge pattern Clips function from the Playlist Menu. This merges the selected Pattern Clips into the uppermost Clip.
- Click-and-hold functions in piano roll - Copy: Hold on an existing note. Slide & Porta: Click and hold when adding a note to cycle through slide, portamento event mode. See General Options settings.
Selection Stretch Handle
After making a selection the Stretch Handle appears. You can click and drag this to stretch the selected notes. Hold the (Alt) key to apply snap settings. Alternatively, hold (Right-Shift) key then click on the right-side of a note in the group and drag.
Mouse-wheel Property Note Changes
Hold your mouse over the note and hold (Alt+Mouse-wheel) to change the currently selected note property. To see the property being adjusted maximize the vertical zoom. To fine-tune, hold (Ctrl+Alt+Mouse-wheel)
Note Properties & Event Editor
The note properties editor gives you access to a number of per-note properties and event data velocity, pan, release (where supported), Mod X & Y (where supported), pitch etc. Select the data to be edited with the Target control, as shown below.
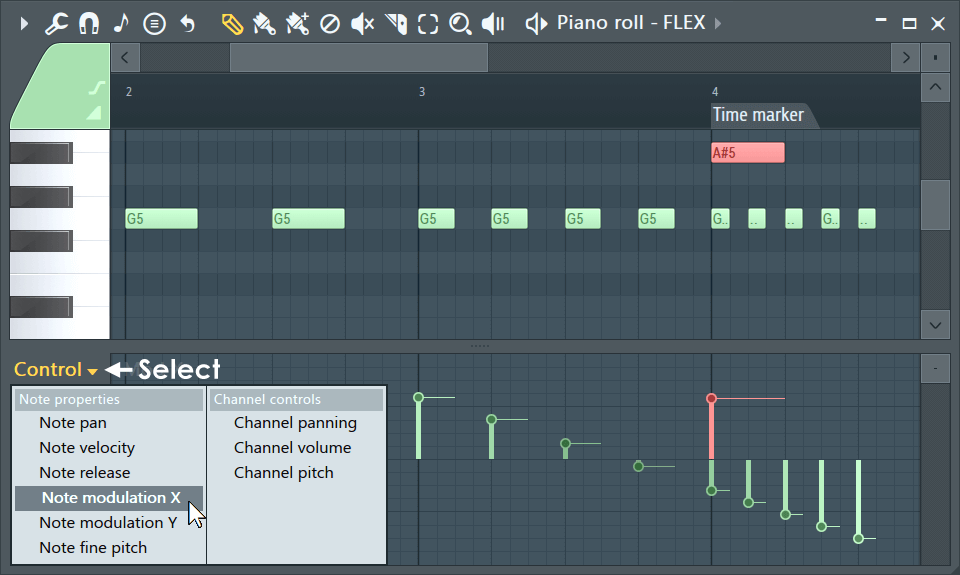
- Selecting Targets - Left-click to select from the menu. You can also roll your mouse-wheel while hovering over the selector.
- Note properties - are displayed as vertical lines with a small circle at the top. The right-facing tail allows you to see the independent values of notes with the same start time. Note properties move with the notes they belong to. The editor can also display standard Event Automation associated with the pattern. To edit the properties of a note when it has the same start time as others, make a selection first, then edit the property for the note (as shown above in red). To set each note's property to the same value, use (Shift+Left-Click) and drag across the area that should be affected. To reset a property, use (Alt+Left-Click).
- Note events - When editing Automation Events the editor works in the same way as the Event Editor.
Time Signatures
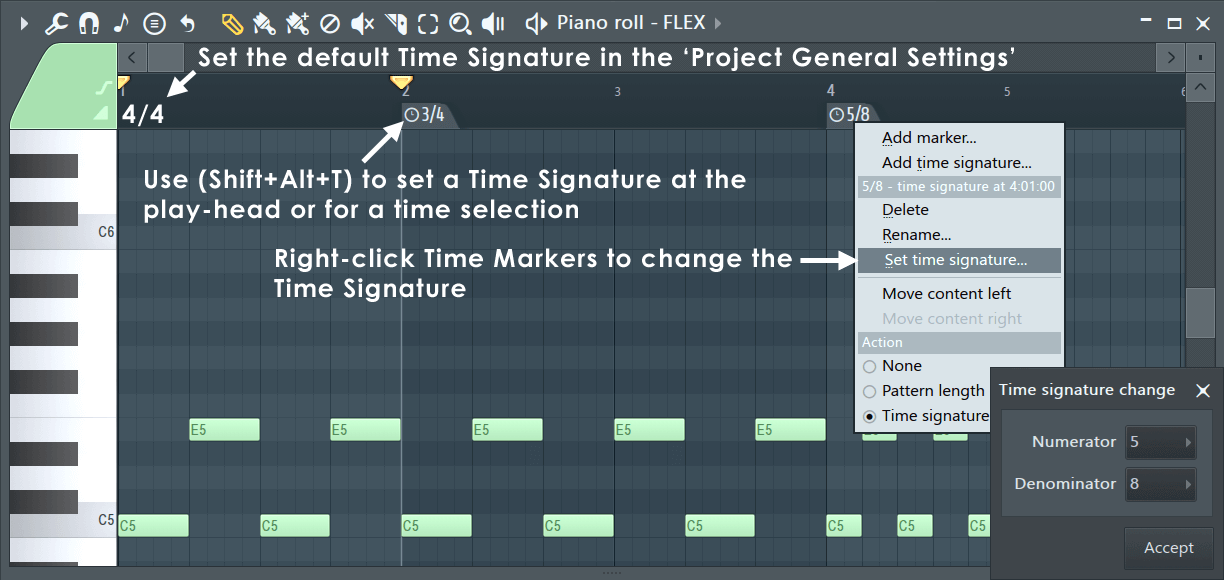
The default Project Time signature is set in the 'Project General Settings > Time settings > Set as time signature'. You can also set custom and even multiple Time Signatures per Pattern. And, since Patterns exist independent of the Playlist Time Signature, you can use multiple Time Signatures at any point in the Playlist (polyrhythms) by stacking Patterns using different Time Signatures. This flexibility means you need to manage your Pattern and Playlist time signatures independently.
NOTE: Time Signatures are a visual helper for the Piano roll and Playlist grids. They have no technical effect on the notes played, except for the downbeat heard when using the Metronome. You can safely change Time Signatures for the Pattern without affecting the notes, only the grid behind them changes. One Channel affects all - As Time Signatures are set per-Pattern, changing the Time Signature for any Piano roll (Channel) will affect ALL Channels in the Pattern. Use the Pattern Clip menu option 'Make unique' to avoid this, if it is a problem.
TIPS: Here are some useful tips for working with Time Signatures. This applies both to the Piano roll and Playlist.
- Set a custom Time Signature - Place the Play head at the point you want to set the new time signature and hold (Shift+Alt+T) to open the Time Signature tool.
- Set a Time Signature range - Make a time selection and hold (Shift+Alt+T) to open the Time Signature tool. The Time Signature will return to the Project Default at the end of the selection.
- Set a Time Signature based on the Pattern Clip location in the Playlist - Open the Clip Menu and select 'Use current time signature'
- Move Time Signatures - Drag the Time Marker/s. Additionally you can use this feature to set partial bars of a given Time Signature.
- More on Time Signatures - See: Playlist Time Signatures & Project General Settings.
Scales & Keys (Key Signatures)
While there are always exceptions to this rule, if you use notes from a single Key and Scale your melodies and, to a slighly lesser extent, chords will sound more harmonious (i.e. better). That's why Snap to scale is such a powerful tool for composing, particularly if you are new to music and don't have a good grasp of what Keys and Scales are. Closely related to Snap to Scale is the Chord Progression Tool, check it out after reading this section. Let's dig a little deeper into this topic ...
In Western music, there are seven 'natural' notes named — A, B, C, D, E, F and G. These are the white notes on a Piano keyboard. By adding 'sharp' or 'flat' versions of these notes, filling in semi-tone or 'half step' intervals, the total number of notes rises to 12. These are the black notes on a Piano keyboard. From these 12 notes almost all Western music is made. The notes can be arranged into scales, where the starting, or tonic note, is repeated at the beginning and end of the scale. More specifically, the important fact is, scales are just pre-defined sequences of note-to-note pitch intervals, with the scale named after its tonic (starting) note. It is the relationship between notes, their pitch intervals that is the most important thing in music, not the notes themselves. Notes in a scale work in a similar way to how colors that look good together do. In other words, this is about groups of notes that sound good together. Not played all at the same time, but in sequences or sparesly selected groupings.
All ascending Major scales have the following sequence of pitch intervals from one note to the next - Tone (200 cents), Tone (200 cents), Semitone (100 cents), Tone (200 cents), Tone (200 cents), Tone (200 cents), Semitone (100 cents). This allows you to start on any note and create a Major scale by following this sequence of note pitch 'intervals'. The result is, all Major scales have a similar sound or melody regardless of the note you start on. If you check the 'Scale' list shown in the Scale menu below, these are just different sequences of intervals between notes (and yes, there are a lot with odd sounding names). Importantly, by using notes only from within a given scale, you can achieve harmonious sounds, making scales the essential basis for creating melodies (sequences of note intervals) and chords (simultaneous note intervals).
The most common scales used in music are the Major (Ionian) and Minor (Aeolian) scales. Starting at the tonic note, the first difference is the pitch interval between the first and third notes of the scales. In a Major scale this pitch interval is a Major third, four semitones. In a Minor scale, the interval is a Minor third, three semitones. The 'third' here refers to the 3rd note in the scale. Generally people agree, the Major third in Major scales creates a brighter, more positive sound. The Minor third in Minor scales has a darker, more somber sound. So scales are emotional and that is why they discussed so much in music composition because music is about feelings. Particularly Jazz which creates feelings of confusion and anger. Confusion when you first hear it, like trying to solve an intractable puzzle. Anger when you have to listen to those who claim superiority because they understand it.
TLDR:
The Key or notes you should use, are defined by two things - Tonic (starting note) and Scale (note intervals sequence). For example 'C Major (Ionian)' or 'G# Major (Ionian)'. The letter is an indicator you should generally start and end your melodies and bass lines, on or near this tonic note, as this will reinforce the Key. The scale sets the note-to-note intervals that are harmonious. If you set Snap to scale on, then you didn't need to read any of the four paragraphs above! Just start clicking around and entering the notes you like the sound of.
NOTES: The Piano keyboard is designed around the C Major Scale. If you start on C and play only the white notes (up or down) you will play the C Major scale. On other words, the white note intervals are pre-set for C Major. When you combine a Tonic (starting note) and Scale this defines a Key for the music (a 'Key Signature' is printed at the start of all music scores), that sets the harmonic and so emotional tone of the music. Of course, sometimes playing notes out-of scale is also cool.
TIP: (Right-click) the Snap to scale (note icon) and select either the Major (Ionian) or Minor (Aeolian) scale. Then start your melody or bass-line using a note from the first chord in your chord progression. Scales, Keys and Chords are the building blocks of popular music.
Settings
- Note (icon) - From the Piano roll Toolbar:
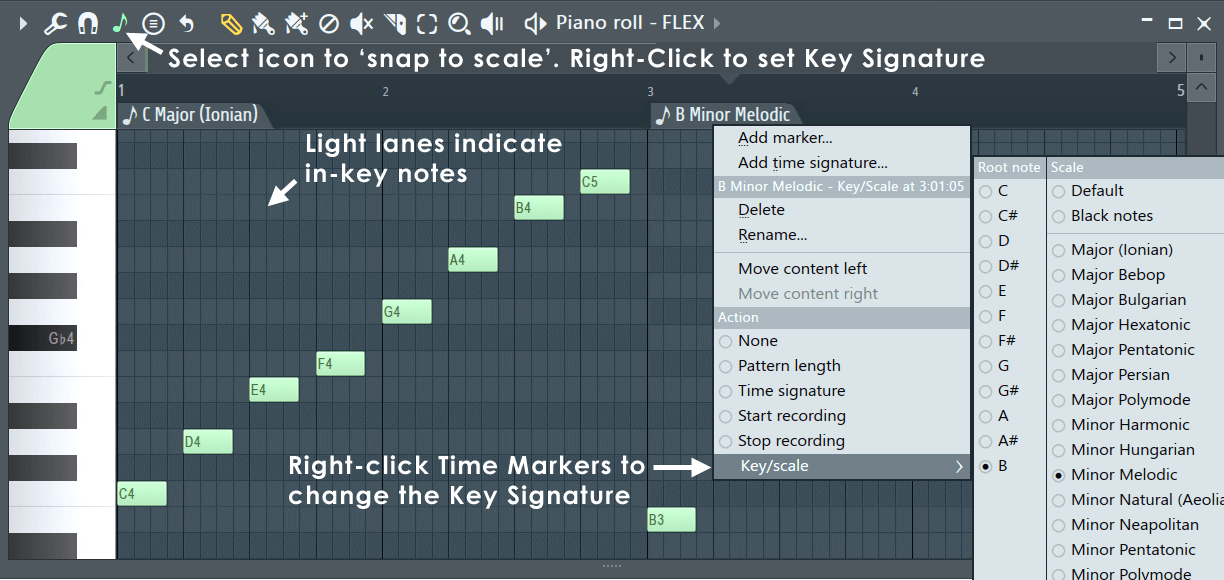
- Snap to scale (Left-Click) - When selected, dragged notes will snap to the Scale and Key (highlighted lanes in the Piano roll). NOTE: Notes won't automatically snap until they are moved, even if they fall out-of-scale after settings are changed.
- Select a scale (Right-Click) - Choose a Tonic, or starting note (left side) and Scale (right side) on the Menu. NOTE: When a scale is selected the background grid of the Piano roll with show notes of that scale highlighted in a lighter color. A Key Signature includes a Tonic note and Scale. Right-Click the Menu to change settings without closing it.
Why 12 Notes & Music Theory?
We recommend watching the following videos:
Waveform Helper View
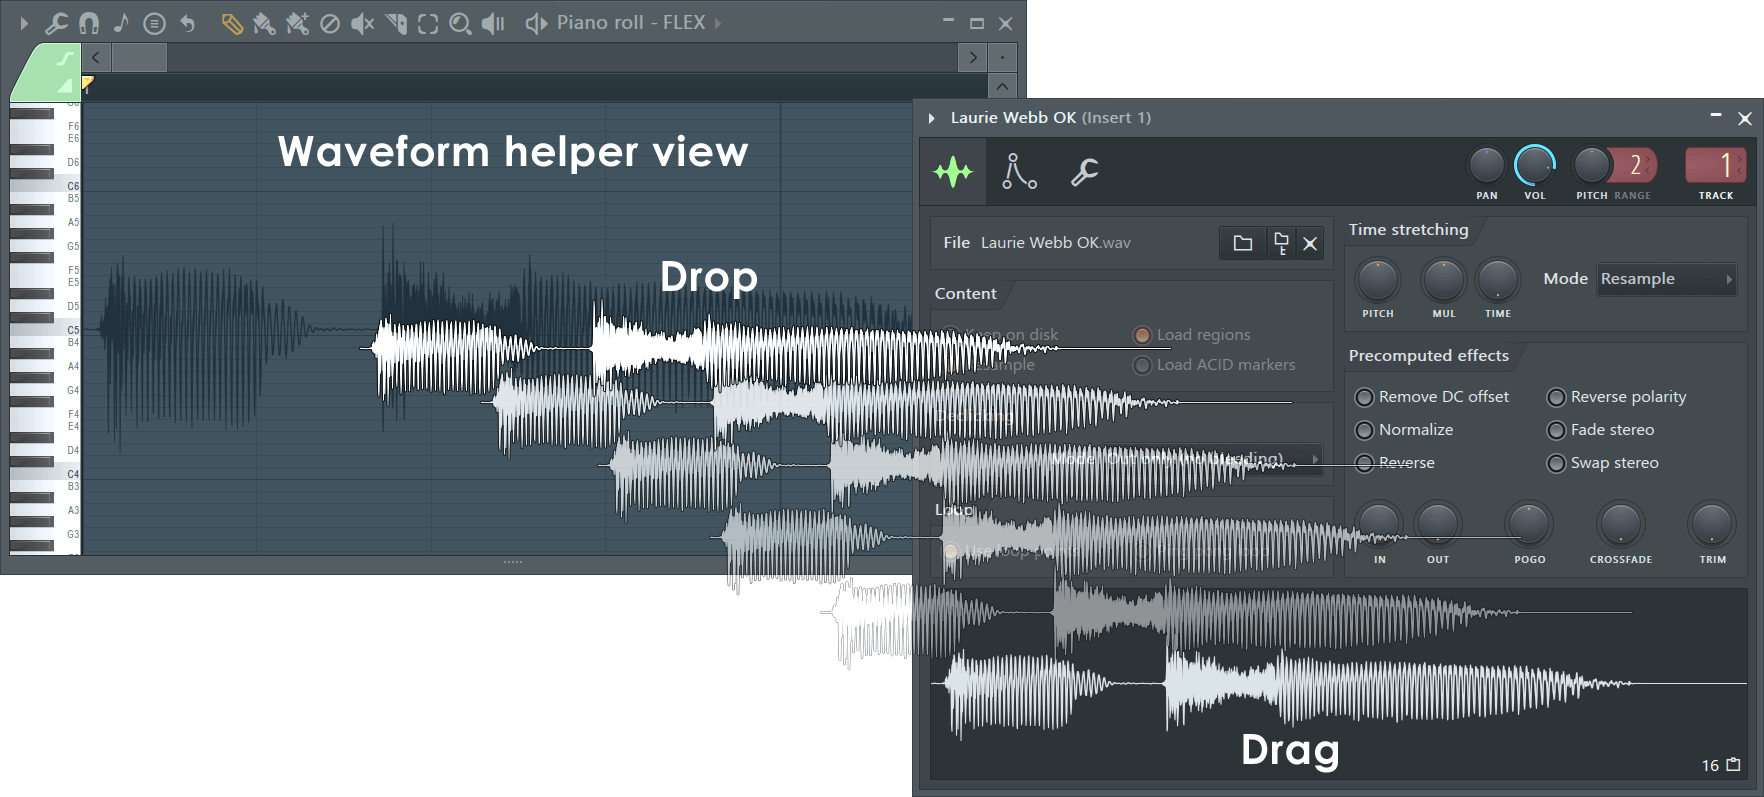
Sometimes it is useful to closely align notes with an audio waveform. For example when using Fruity Vocoder or Pitcher. To show the waveform drag from a waveform preview and drop on the Piano roll. To deselect this view use Piano roll menu > View > Background waveform (Alt+N).
Understanding Slides & Portamento
The following ONLY applies to native FL Studio instruments. To slide a VST instrument automate the channel pitch knob. The Piano roll can slide notes from one pitch to another using slide notes above or below the notes to be affected. Slide notes have a small triangle drawn at the start of the note.
- Portamento Toggle ( O) - When selected, notes added to the Piano roll will display a 'portamento flag' ( icon). The portamento flag causes a short slide in pitch from the end of one note to the note with the portamento flag. This is a note transition effect. NOTES: 1. these features only work with native FL Studio instruments and not VST instruments. 2. Click-and-hold functions in piano roll - Click and hold when adding a note to cycle through slide, portamento note mode. See General Options settings.
- Slide Toggle ( S) - When selected, notes added to the Piano roll become 'slide notes' displaying the slide icon () that causes notes, above or below the slide-note, to slide to the pitch of the slide-note. The slide-time is set by the length of the slide-note.
- Add a slide note - Click the slide switch and then click as normal to add a note to the Piano roll.
- De-select the slide mode - Click the slide button again.
- Channel Settings > Misc - Polyphony > SLIDE (even if grayed out) will interact with Portamento notes, and Time > GATE will interact with Portamento and Slide notes.
NOTE: The General settings Click-and-hold & special gesture functions activate cycle slide/porta. Click and hold when adding a note to cycle through slide & porta event modes.
How slide notes work
Slide notes are used to create 'glissando' effects. That is, a continuous slide upwards or downwards in pitch between two notes.
- Notes - Slide notes must overlap the note they slide. A slide note, played on its own, without overlapping a standard note, will not produce sound. The length of the overlap sets the slide time.
When the slide note is reached the pitch of the original (standard) note will start sliding toward the slide notes pitch, reaching the same pitch at the end of the slide note event. The length of the slide note controls the rate of pitch-changed of the slide. If the note being slid, ends before the slide notes pitch has been reached, the slide will terminate prematurely.
- Chords - If notes are overlapping, so they form part of a chord, the topmost note is used as the reference for the pitch offset (see picture below). All notes in the Chord will slide so the topmost note reaches the same pitch as the slide note, with all notes in the chord moving the same note interval. After the slide event ends, notes still remain offset from their original pitch. Note colors can be used to create independent slides for up to 16 notes in a chord. Notes of the same color group, slide each other.

NOTE: Slide events have all the usual note properties (velocity, panning, cutoff and resonance, etc). During slides all note properties move toward those set in the slide note. Slides themselves do NOT produce sound, although they allow preview when created/moved.
How portamento notes work
Portamento applies only to the transition from one note to the next. This is basically a fast slide, only at note transitions. The effect is most audible when larger note intervals are used. The Portamento indicator should be set on the note to receive the portamento effect.
Color Groups (Slides, MIDI, Editing)
Editing - To select the note/slide color, click the Color selector then one of the 16 colors on the color group selector and click in the Piano roll to add notes. To change the color group of existing notes, make a selection and use the Piano roll menu > Edit > Change color (Alt+C) option.
By creating color groups you can choose to edit the properties of only notes of the selected color. This can be handy when there are overlapping notes in the same Piano roll that you wish to manipulate independently. Colors are used for independent processing of notes in the Piano roll, these include:
- MIDI Channels - Each color is locked to a particular MIDI channel. To see the relationships, hover the mouse over each color and look
at the hint bar where the MIDI channel number is displayed. NOTE: This only applies to plugins hosted by the Wrapper, in other words, these MIDI channels will only
be visible to the plugin associated with the Piano roll. To control external MIDI hardware on separate MIDI channels use the MIDI Out plugin.

NOTE: You can load and save complete note color palettes from the Piano roll menu > View > Note colors option.
- Sliding - Slides will apply only to notes of the same color as the slide note event. For example, yellow slide note will bend the pitch of
yellow notes, but will ignore green notes. This way you can have up to 16 notes sliding simultaneously in different directions.
Slide color groups are also used with the Mono mode in the polyphony settings (see Miscellaneous Channel Settings). Mono mode applies to each color group separately. So using all four colors actually can result in a polyphony of up to 4 voices at once.
- Recording notes - To record incoming MIDI Channels from a controller or MIDI sequencer to the correct MIDI note colors, Right-Click the instrument's Channel Rack button and activate the 'MIDI channel through' option.
NOTE: Some plugins use note colors for special functions. For example Harmless, Harmor and Slicex.
Note Properties Dialog
The Note Properties pop-up is an alternative way to set notes properties. It's particularly useful when you need to set different properties for notes that start simultaneously (so their properties appear as one in the integrated event editor). Double-click a note to display the properties pop-up box.

- Levels - These controls allow changes to per note - panning (PAN), note on velocity (VEL), release velocity (REL), channel filter cutoff (MODX) and channel filter resonance (MODY). NOTE: MOD X/Y can also link to custom parameters as set in native plugins. Harmor has Mod X/Y controls that map to these parameters, for example. Release velocity is supported in Sytrus, Harmor, Harmless and Ogun.
- Slide - Slide ON / Slide OFF. Determines if the note will respond to slide events. Porta - ON, inverts the portamento state for this note. If the global portamento (see Misc Channel Settings) for this channel is off, for this note it is on and vice versa.
- Color - Click on this to select the color channel group the note is on.
NOTE: If the note you double-click is a part of a selection, then the properties you set apply to all notes in that selection. The Time section is not available in that case, because the selected notes might have different length or start point.
- Time - Change the Start Time (note position) in bar:step:tick. The length of a 'tick' depends on the PPQ setting. Reducing PPQ mid-song will reposition any notes not falling on an exact Bar or Step boundary.
- Duration - Change the Note duration in bar:step:tick. The length of a 'tick' depends on the PPQ setting. Reducing PPQ mid-song will reposition any notes not falling on an exact Bar or Step boundary.
- Reset - Resets note properties to levels they had before launching the properties box.
- Accept - Apply your awesome changes!
Piano roll Menu
This menu provides many important functions for working with the Piano roll, such as copying and pasting notes, converting color groups, etc. You can access Piano roll's menu by clicking the Piano roll menu button. For more information, see the Piano Roll menu page.
Multi-touch Gestures
See FL Studio User Interface > Multi-touch support
Piano roll keyboard shortcuts
See the Playlist Keyboard Shortcuts page.