AUTOMATION & RECORDING
Linking & Using Internal Controller Sources 
Internal controller plugins, either effects such as the Fruity Peak Controller or generators like an Automation Clip, can be used to move FL Studio and plugin controls automatically. The Fruity Peak Controller, for example, can follow the volume envelope of an input sound and move a knob or slider in response. Alternatively the Automation Clip moves linked controls according to a user drawn envelope path.
Internal automation sources include:
- Automation Clips - Draw your own automation curves in the Playlist.
- Control Surface - Create your own interface, link it to target controls and control them from one 'Surface'.
- Event Editor - Draw or record your own automation associated with patterns.
- Fruity Envelope Controller - Play back user-specified envelopes from the Piano roll/Step Sequencer.
- Fruity Formula Controller - Define your own controller functions using mathematical formulae.
- Fruity Keyboard Controller - Use controller keyboard performances as a control source.
- Fruity Peak Controller - Generates controller data based on audio input and LFO settings.
- Fruity X-Y Controller - Control two parameters simultaneously with your mouse.
- Dashboard - Create your own interface, link it to target controls and control them from one 'dashboard'.
- Touch Controllers - Touch enabled Keyboard and Drumpads.
- VFX Envelope - Per voice Velocity (volume), Pitch, Pan & X/Y targets.
- ZGameEditor Visualizer - Analyze videos to create Red, Green, Blue and Luminance control signals.
Linking to external controllers
For help linking to external controllers see this page.Linking a software interface control to an internal controller
Most knobs, sliders and controls that you can change with a mouse in FL Studio can also be automated by one of the above automation sources. NOTE: It is possible to link a single controller to multiple targets (see below).
Native FL Studio interface & plugin controls:
- Load an internal controller (optional) - You can skip this step if you are creating an Automation Clip OR linking to an external MIDI Controller. Otherwise, load an internal controller somewhere in your project. Some internal controllers load as effects in the Mixer and others as generators in the Channel Rack, see the list above.
- Right-Click the knob/slider target you want to control.
- Link to the controller - Select Link to controller option to open the 'Remote control settings' dialog. NOTE: If you move any knob or slider on an external controller at this point it will be automatically linked to the target control. However to create an internal link:
- From the Internal controller > Link assignment menu select the internal controller and Accept. The target will now be under the remote-control.
VST/AU plugin interface controls:
There are two methods; Prefer 'Last tweaked control' unless that does not work, then use the 'Browser' method. Not all plugins support 'Last tweaked control'. Both methods create the same link.
Last tweaked control:
- Load an internal controller - You can skip this step if you are linking to an existing Automation Clip. Some internal controllers load as effects in the Mixer and others as generators in the Channel Rack, see the list above.
- Initiate the link - Right-Click the Multilink controllers switch and select 'Link to controllers' OR Open Tools Menu > Last tweaked > Link to controller'
- Assign the controller - From the Internal controller > Link assignment menu (see image above), select the internal controller and Accept. The target will now be under the remote-control.
Browser:
- Load an internal controller - You can skip this step if you are linking to an existing Automation Clip. Some internal controllers load as effects in the Mixer and others as generators in the Channel Rack, see the list above.
- Browser - From the Browser > Current project > Generator / Effects folder, locate the Plugin and click it. This will open the list of automatable parameters.
- Make the link - Right-Click the desired target and select 'Link to controller'.
- Assign the controller - From the Internal controller > Link assignment menu (see image above), select the internal controller and Accept. The target will now be under the remote-control.
Controls & Options
The following options can be used to modify the linking behavior.
Link Assignment
- Link menu - Showing 'Link 1' above. Use this menu to link several external MIDI controllers to the same internal target. By default the dialog assumes a new link is to be made.
- Remove Conflicts - When selected, any new link will replace any previous link relationships made to the target controller.
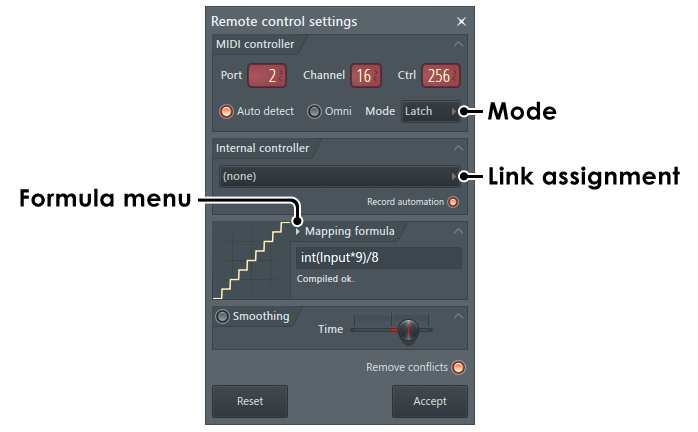
MIDI Controller:
This section is useful when linking a control to a MIDI controller. For more information see Linking & Using USB/MIDI Controllers section.Internal Controller:
Here you can link the property to an internal controller that controller plugins provide. Note that this section is NOT VISIBLE when there aren't any controller plugins added in the current FL Studio project.
- Record Automation - This switch should be usually turned off. When turned on, all events generated by the controller plugin will be recorded during a live recording session, as if you moved the control manually. However, you may turn this switch on if you want to use the controller plugin as a tool (like you use the LFO tool) to record specific set of events that you can then further refine and edit in the Event Editor window. It also makes possible to record events from controller plugins that might use much CPU when used in real-time. Don't forget to unlink the control after you recorded the events you need, not doing so may result in unwanted behavior (due to conflict between the recorded events and those generated in same time by the plugin).
Mapping formula - Menu
This menu provides some pre-defined mapping relationships between the controller and the target control.
- Linear (absolute): For use with standard range-limited controllers.
- Default - The controller changes the target with a 1:1 relationship.
- Inverted - Increases in the controller value decreases the target controller and vice versa.
- Log scale - Sensitive in the low range less sensitive in the upper range of the controller.
- Inverted log scale - Less sensitive in the low range more sensitive in the upper range of the controller.
- Switch - Once the input value passes the 50% point the output changes from 0% to 100%.
- Steppy - Stepped output in the face of smooth input.
- Steppy (cents to semitones) - When linked to a master pitch control the output is incremented in semitones.
- First half - Output varies from 0% to 50%.
- Last half - Output varies from 50% to 100%.
- Incremental (relative): These settings are to be used with 'Endless controllers' (knobs/wheels that have no end-stops). If an endless knob moves the target too slowly try Input*2 or 1/10.
Similarly endless knobs with around 200 steps (usually endless knobs are ticky), each step can be set to output increment unit, try 1/50,1/20,1/10 settings.
- Default increment - The controller changes the target with a 1:1 relationship.
- Inverted increment - Increases in the controller value decreases the target controller and vice versa.
- 4x, 2x smaller increment - Output is divided by 4 and 2 respectively.
- 4x, 2x bigger increment - Output is multiplied by 4 and 2 respectively.
- 1/50,1/20,1/10 increment - Output is restricted to 2%, 5% and 10% of the input range.
User Defined Formula
- Direct entry - To alter the default 1:1 mapping - For example: 'Input*2' multiplies the controller value by 2. After you enter an expression, press Enter. If you see message "Compiled OK" the formula was successfully compiled and you can press the OK button to apply it to the linked control. If a red text appears below, the formula is wrong (usually syntax error or unsupported variable/function was used). Correct the error and press Enter again.
- Add custom formula in the Formula Menu - Edit the Formulas.txt file in the FL Studio installation folder ..\Image-Line\FL Studio\System\Config\Mapping. The format is the preset name followed by the : character, then the formula. For example: Up and down smooth:Sin(Input*Pi)
For a full list of supported variables, functions and operators click here.
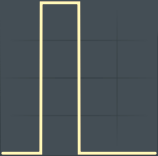
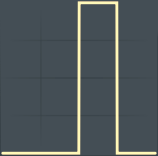
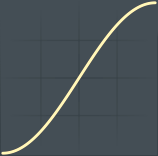
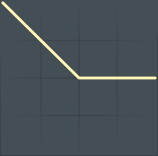
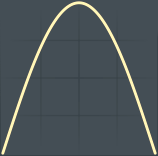
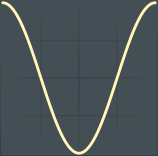
| Example Formula | Result |
|---|---|
| 1-Min(Round(Input*2),1) |  |
| ifg(input,0.25)+ifl(input,0.5)-1 |
 |
| ifg(input,0.5)+ifl(input,0.75)-1 |
 |
| Max(Round(Input*2),1)-1 |
 |
| int(Input*9)/8 |
 |
| Input*2-1 |
 |
| 1-(Max(Input,0.5)- Min(Input,0.5))*2 |
 |
| 1-Cos(Input*Pi)*0.5-0.5 |
 |
| Max(Input,0.25)-Min(Input,0.25) |
 |
| Max(Input,1)-Min(Input,0.5) |
 |
| Max(Min(Input,0.75),0.5) |
 |
| Max(Min(Input+0.25,1),0.5)*2-1 |
 |
| Sin(Input*Pi) |
 |
| Sin(Pi*0.5-Input*Pi*2)*0.5+0.5 |
 |
| 1-Input*0.5-0.5 |
 |
| 1-Input*0.5 |
 |
Smoothing:
This feature allows you to smooth the motion produced by the remote control hardware and/or internal plugin. This reduces the need to manually refine recorded automation after live sessions and ensures proper ramping of the control motion to avoid abrupt changes.
- Time - The amount of smoothing applied to the remote control input. The longer the time, the smoother the motion.
Action Buttons
- Reset - Click this button to reset the remote control settings, including mapping formula & smoothing.
- Accept - Saves the dialog settings.