INSTRUMENTS / GENERATORS
Fruity Envelope Controller
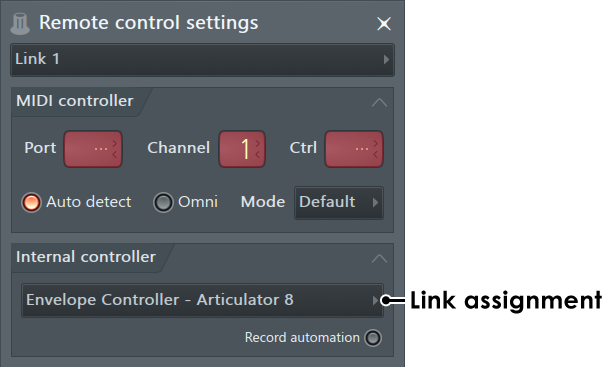
Fruity Envelope Controller generates automation data to control modulation targets (interface knobs, sliders etc.) from the Piano roll or live keyboard/MIDI input. Read more about other internal automation controllers here. NOTE: When the Envelope Controller is loaded in the Channel Rack it will appear as 8 x Articulator options on the Link to controller' Right-click dialog on automatable controls 'Link assignment' menu.
Automation varies a target parameter in FL Studio or plugins under the control of an automation source. See a ![]() Fruity Envelope Controller
video tutorial here. A closely related plugin is the Fruity Keyboard Controller.
Fruity Envelope Controller
video tutorial here. A closely related plugin is the Fruity Keyboard Controller.
There are 8 articulators per plugin. Each Articulator combines the output from any or all of the following modulation sources:
- Envelope - Keys trigger an envelope.
- LFO - Keys trigger a Low Frequency Oscillator.
- Keyboard Mapping - Keyboard key number (position) exercises an envelope.
- Velocity Mapping - Keyboard velocity exercises an envelope.
- Modulation X & Y Mappings - Controllers linked to the X and Y knobs exercise an envelope.
- Random - Keys trigger a random values, under envelope control.
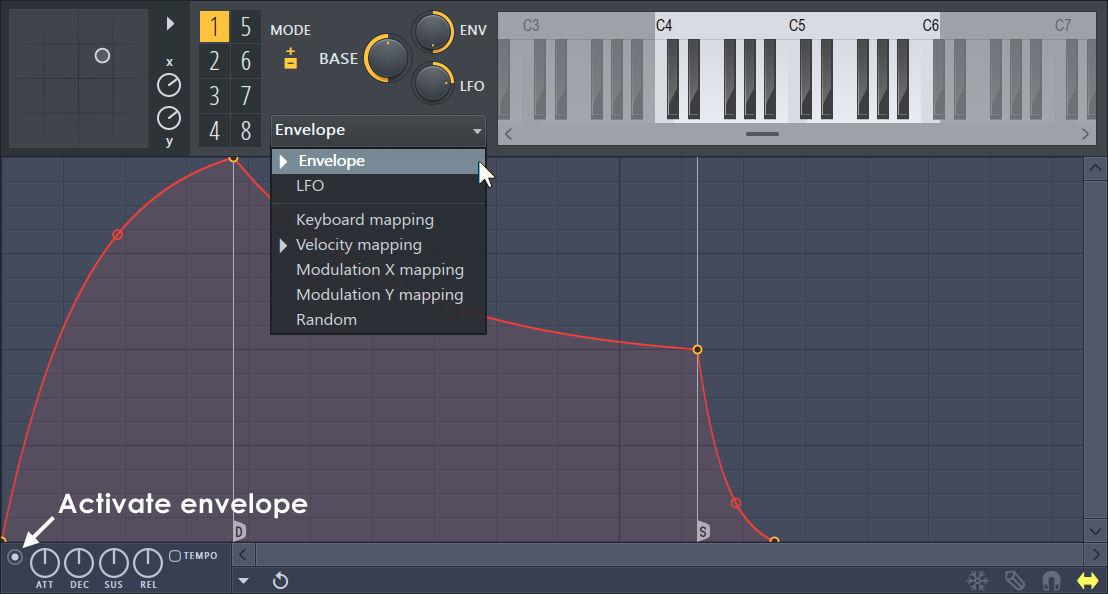
NOTE: Modulation sources combine under each Articulator, so remember to deactivate or neutralize any unused envelopes if the plugin does not behave as expected. Active modulation sources show an arrow-marker in the drop-down list (see 'Envelope' and 'Velocity mapping' above).
Video Tutorial
BONUS: Download the projects used in this tutorial here.
Controls
Create unique combinations of the 7 modulation sources (Envelope, LFO etc.) under each of the 8 Articulators. Assign Articulators to unique keyboard ranges so you can control up to 8 modulation targets independently from a single keyboard or Piano roll.
How to prepare an Articulator:
- Load Fruity Envelope Controller in the Channel Rack.
- Select an Articulator.
- Left-click and drag on the mini-keyboard to set a unique range for the articulator (optional).
- Select one or more source envelopes (Env, LFO, Key Mapping, Vel Mapping, Mod X/Y, Random) and edit as needed.
- Use the Link Dialog > 'Link assignment' menu to link modulation targets to Articulators.
- Play your hardware keyboard/controller or add notes to the Piano roll to control the target.
Articulators
The Articulator groups a set of modulation sources. You can map them to play from a unique Piano roll/MIDI Keyboard range. The Articulators become the modulation options shown in the Link Dialog > 'Link assignment' menu.
NOTE: Give each instance of Fruity Keyboard Controller a unique Channel name. This will help you to select the correct Articulator from the Link assignment menu when you use more than one instance of the plugin in a project.
Mode
Click on the 'MODE' switch to select:
 Bipolar - Modulation values range between -1 and +1. Modulation source envelopes are added.
 Unipolar - Modulation values range between 0 and +1. Modulation source envelopes are multiplied.
BASE, ENV & LFO Knobs
These controls apply to the selected Articulator:
- Base - Add or subtract an offset value to the Articulator.
- Envelope - Multiply the output of the Envelope by -1 to +1.
- LFO - Multiply the output of the Low Frequency Oscillator by -1 to +1.
NOTE: Setting a negative multiplier inverts the phase of the modulator output.
Keyboard Range
Each articulator can be set to activate over a unique keyboard range:
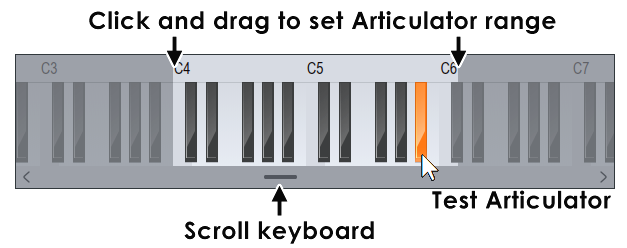
- Set articulator range - Click and drag on the note ruler above the keyboard. Drag past the end of the keyboard to select-and-scroll.
- Scroll the keyboard - Use the controls along the bottom, arrows and scroll bar.
- Test articulator - Click a key. NOTE: Most keys just trigger the modulation sources as set for the Articulator. To output different values depending on the Key value, use the Keyboard Mapping option or Fruity Keyboard Controller.
The Envelope Editor
The Envelope Editor follows the standard design as found in other places including Edison, Sytrus and Harmor etc.
NOTE: Enable/Disable Switch - To use an envelope/mapping, you need to enable it by clicking the switch at the bottom left side of the editor (see the screenshot above).
Curve Editing
Basic envelope editing operations:
There are several basic operations for editing the envelope/mapping shape:
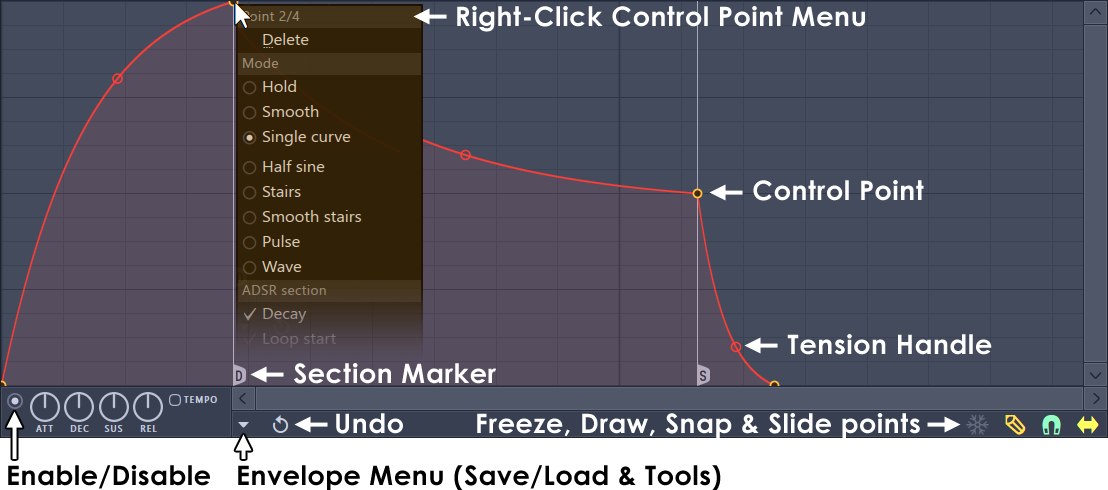
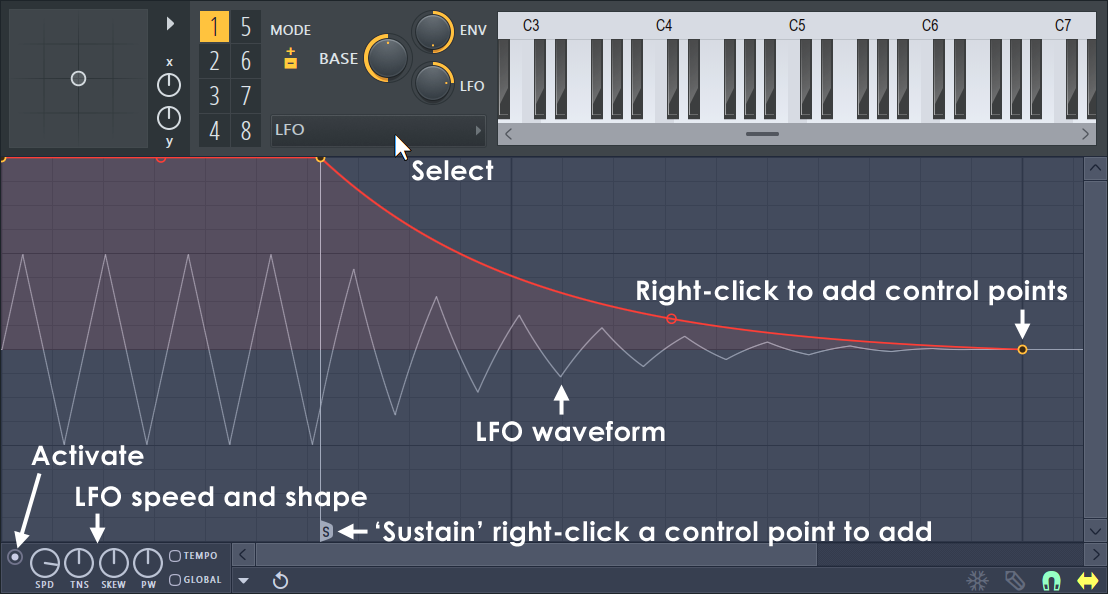
- Add a new Control Point - Position your cursor over the line, or envelope background, and right-click.
- Reposition a Control Point - Left-click and drag control points. Hold SHIFT while dragging to lock the vertical position, or CTRL to lock the horizontal position.
- Delete a Control Point - Right-click a control point and select Delete. Alternatively, hold Right-ALT and Left-click.
- Change Segment Type - The envelope editor offers three types of spline segments to select from. Right-click a control point and you will see three spline type options (the affected segment is the one preceding the control point): Single Curve - the default mode which allows you to create linear, ease in and ease out curves (depending on the tension); Double Curve - allows linear, ease in-out and ease out-in curves (depending on the tension); Hold - creates "hold" or "pulse" curves which are handy for creating abruptly value changes in your envelope.
- Change Segment Tension (Acceleration) - You can drag the tension handle (see the screenshot above) of each spline up/down to change the spline appearance. Right-click the handle to reset to a straight line. Hold CTRL during adjustment to fine tune.
Section Markers (ADSR)
Some envelopes allow ADSR (attack, decay, sustain, release) control point types. To add a marker right-click a control point and select:
- S (sustain): Marks the end of the decay section and the start of the release section.
- L (loop): Marks the start of a sustain loop section, thus enabling you to define an envelope section to be repeated while a voice is sustaining.
- D (decay): Marks the start of the decay section.
- DL (decay/loop): Combines the function of the D and L markers.
NOTES: Not all Markers will be available or make sense to use depending on what is already selected. Without markers the envelope will be articulated once from start to end when triggered.
Envelope Menu
Please check the placement of the load/restore button in the screenshot above.
- Open state file / Save state file - Opens/saves envelope states. Several different pre-defined state files are available.
- Copy state / Paste state - Use this to copy and paste envelopes, usually between instances of the EQ editor across open plugins.
- Reset - Reset to default state.
- Prepare for smooth editing - Creates a smooth tension between existing points.
- Select all - Selects all points for simultaneous adjusting.
- Deselect all - Deselects all points.
- Invert - Selects all points except currently selected.
- Cut - Cuts points.
- Copy - Copies points.
- Paste (insert) - Inserts copied points after a selected point.
- Paste (replace) - Replaces selected points with copied points.
- Duplicate - Duplicates selected points.
- Delete - Deletes selected points.
- Make all loop - Includes all points into a loop.
- Insert point at locator - Inserts a point at the position of the locator.
- Flip vertically - Inverts the current envelope.
- Scale levels - Opens the Scale Level tool.
- Normalize levels - Scales the envelope so the highest and/or lowest levels reach +/- 100%.
- Decimate points - Opens a simple tool that allows manipulation of the number of control points in the envelope (useful in conjunction with Analyze audio file).
- Filter - Opens the Envelope Filter tool (useful in conjunction with Analyze audio file).
- Smooth up - Opens the Smooth Up tool that allows smoothing of the envelope shape (useful in conjunction with Analyze audio file).
- Smooth up abrupt changes - Quick removal of 'spikey' or sudden changes in the envelope.
- Turn all points smooth - Preset filter to quickly filter the envelope.
- Create sequence - Opens the Envelope Sequencer tool.
- Analyze audio file - Open, analyze and replicate the volume envelope of an input sound file. Drag and drop audio files directly on the Envelope editor for automatic analysis.
- Focus on click - When on, clicking on the envelope editor will focus the control and thus steal keyboard focus from other controls.
- Background gradient - Flips the background gradient shading vertically.
- Invert grid - Flips the background colors.
Envelope Mode Switches
 Freeze - Enable this switch to lock the envelope curve to its current setup. This feature is helpful after you finish with the changes to the spline structure of an envelope and want to protect it from accidental edits (it also hides the handles providing a clear view of the shape).
 Step/Draw - Enable this option to set the editor in step editing mode - drag in the editor to draw a 'free hand' curve where a new control point is defined for every step in the timeline. Hold SHIFT key while dragging to draw 'pulse' lines (straight vertical/horizontal lines only). Note that each new segment created this way uses the last tension value set while adding a segment.
 Snap - Enable this option if you want the control points to snap to the nearest step in the timeline while dragging.
 Slide - Enable this option to preserve the relative distance between a dragged control point and all control points following it (this option is enabled by default).
Envelope/Mapping Options
Each Articulator allows you to combine up to 7 modulation source envelopes. Options include:
- Envelope - Keys trigger an envelope.
- LFO - Keys trigger a Low Frequency Oscillator.
- Keyboard Mapping - Keyboard key number (position) exercises an envelope.
- Velocity Mapping - Keyboard velocity exercises an envelope.
- Modulation X & Y Mappings - Controllers linked to the X and Y knobs exercise an envelope.
- Random - Key trigger a random values under envelope control.
ENV (Envelope)
The default mode is an ADSR (Attack, Decay, Sustain, Release) style envelope with the possibility to define a loop section and the power of unlimited control points to refine the shape.
How to use:
- Load Fruity Envelope Controller in the Channel Rack.
- Select an Articulator.
- Make sure to Activate the envelope using the switch at the bottom left.
- Link the target Synth, Effect or interface control to the parent Articulator chosen at step 1. The Articulator will be available from the Link Dialog > 'Link assignment' menu
- Edit the envelope as desired.
- Add trigger notes to a Piano roll. Only note on/off events are used, key/note number and velocity are ignored for this control source.
Lower Knobs
- Attack (ATT) - Defines the attack length/speed.
- Decay (DEC)- Defines the sustain section length/speed.
- Sustain (SUS) - Defines the sustain section slope ("decay" amount).
- Release (REL) - Defines the release length/speed.
- Tempo - This switch lets you determine whether the envelope length is relative to the project tempo (changes with tempo) or absolute in time.
NOTE: While adjusting one of these properties you can see a preview of the effect of the knob value on the envelope shape. However once you release the mouse the envelope is restored to its previous view. The knob still has its effect, though it is not reflected in the curve to avoid distortion and to make editing easier.
LFO (Low Frequency Oscillator)
An LFO (Low Frequency Oscillator), is a repeating waveform designed to modulate a target control. The modifier envelope (red) allows you to add control points to change the LFO over time.
How to use:
- Load Fruity Envelope Controller in the Channel Rack.
- Select an Articulator.
- Make sure to Activate the envelope using the switch at the bottom left.
- Link the target Synth, Effect or interface control to the parent Articulator chosen at step 1. The Articulator will be available from the Link Dialog > 'Link assignment' menu
- Edit the LFO speed and shape using the knobs on the lower left of the editor.
- Add an envelope to modify the LFO over time (if desired).
- Add trigger notes to a Piano roll. Only note on/off events are used, key/note number and velocity are ignored for this control source.
Lower LFO Controls
- Speed (SPD) - Defines the LFO speed.
- Tension (TENS) - Defines the LFO curve "tension" - basically this parameter lets you morph the LFO shape from triangular through sine-like to pulse-like (square) shape.
- Skew (SK) - Defines a balance between the odd/even splines in the LFO visible as shape 'skew'.
- Pulse Width (PW) - Sets the pulse width, i.e. basically the balance between the first and the second half of the LFO phase.
- Tempo - This switch lets you determine whether the envelope/LFO speed is relative to the project tempo (changes with tempo) or absolute in time.
- Global - Normally the LFO envelope is started from the beginning for each note ("local" LFO) . If this option is enabled, the envelope is "global" and thus stays in the sustain state without restarting for the whole duration of the song.
Keyboard Mapping
The Keyboard Mapping maps MIDI note number to an output envelope value between 0 and 1. Low notes are to the left and high notes to the right. The vertical white line on the graph shows the value of the last note/key received.
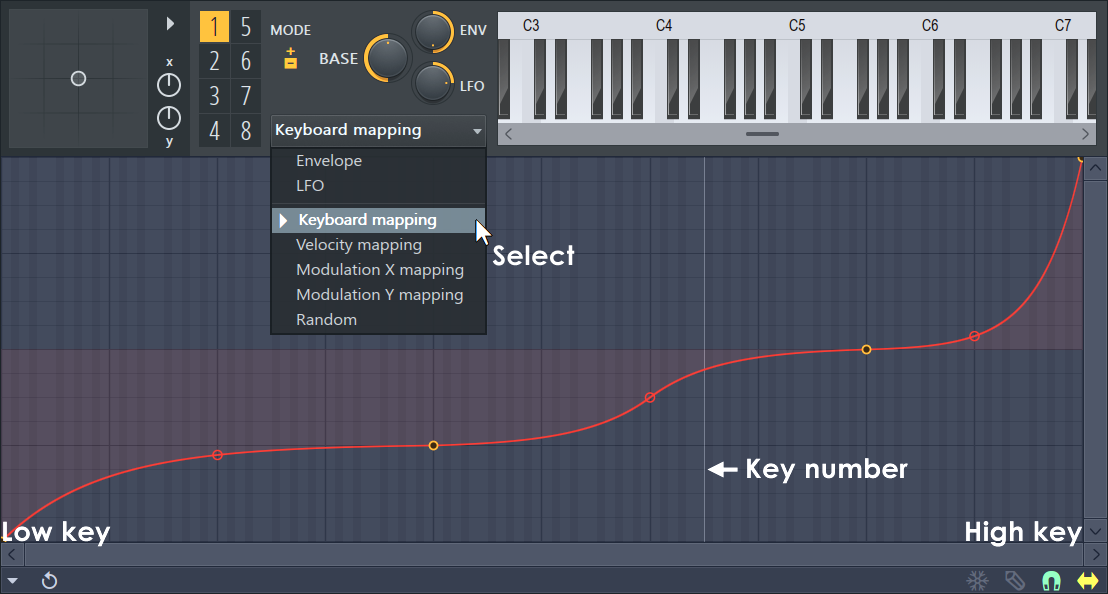
- Select an Articulator.
- Link the target Synth, Effect or interface control to the parent Articulator chosen at step 1. The Articulator will be available from the Link Dialog > 'Link assignment' menu
- Modify the mapping envelope as desired.
- Add trigger notes to a Piano roll or play notes from a keyboard/controller. Only Key/Note number is used Velocity is ignored for this control source.
Velocity Mapping
Note velocities are mapped to an output value between 0 and 1 as defined by the envelope. Low velocities are to the left and high velocities to the right. The vertical white line on the graph shows the velocity of the last note/key received by the plugin.
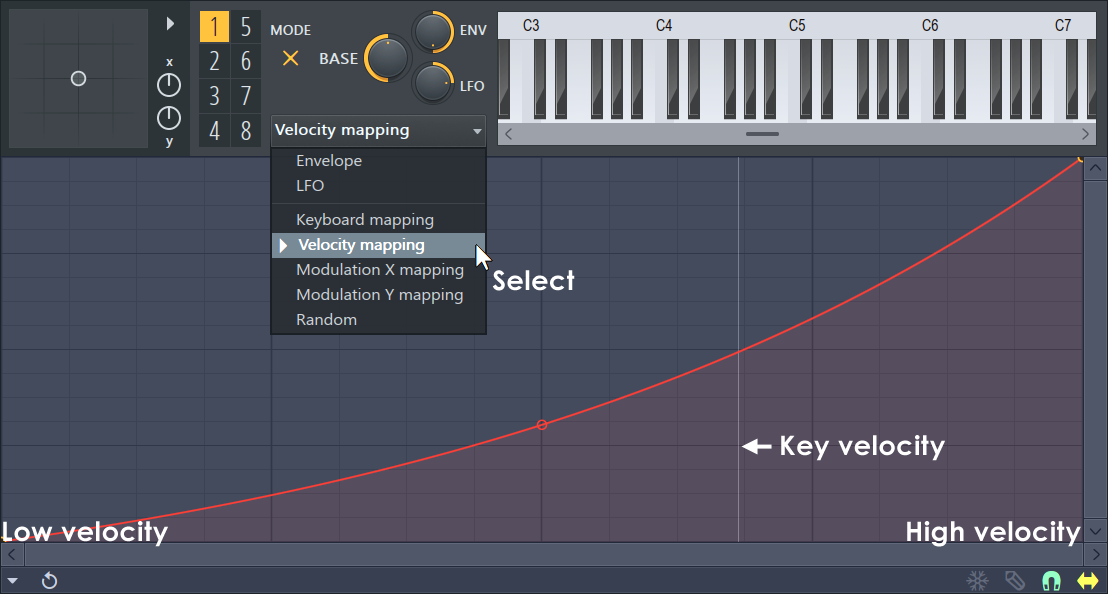
- Select an Articulator.
- Link the target Synth, Effect or interface control to the parent Articulator chosen at step 1. The Articulator will be available from the Link Dialog > 'Link assignment' menu
- Modify the mapping envelope as desired.
- Add trigger notes to a Piano roll or play notes from a keyboard/controller. Only Key/Note velocity is used Key/Note value is ignored for this control source.
X/Y Controls & Smart Knobs
The X/Y mapping controls respond to the Piano roll X & Y note modulation values, controllers linked to the X and Y knobs OR mouse/touch input.
X/Y Modulation
The Piano roll Note Properties Editor makes available Modulation X and Modulation Y sources when the channel holds a Fruity Envelope Controller. Create per-note modulation for any plugin by linking its interface targets to Mod X and or Y and then manipulating the from the Fruity Envelope Controller.
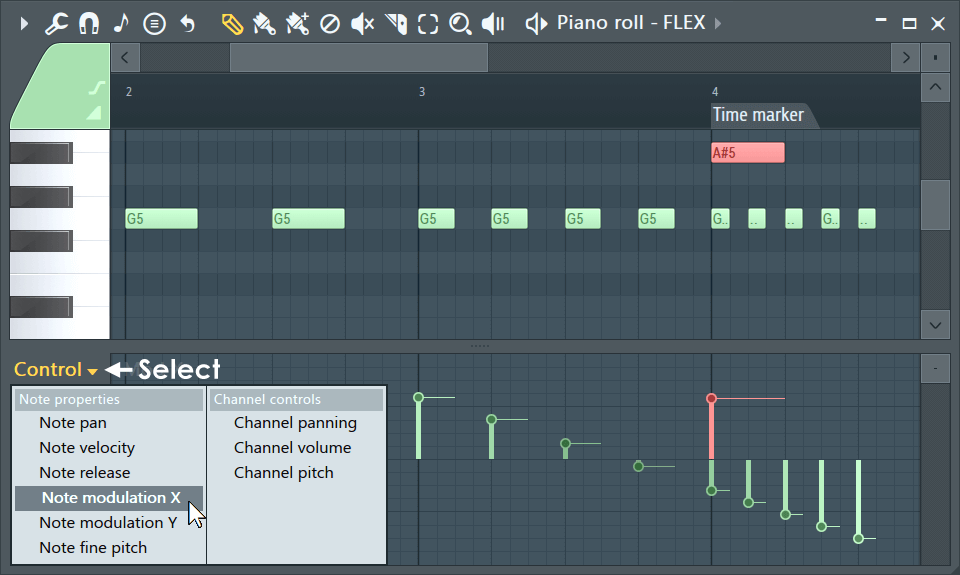
How to use:
- Load Fruity Envelope Controller in the Channel Rack.
- Select an Articulator.
- Open the Piano roll associated with the Envelope Controller.
- Select Note modulation X or Y from the Target Control (shown above).
- Edit the X or Y note properties as desired.
- Link the target Synth, Effect or interface control to the parent Articulator chosen at step 1. The Articulator will be available from the Link Dialog > 'Link assignment' menu
Smart Knobs
The idea of a 'Smart Knob' is to re-map the input to output relationship between a hardware controller (and or the plugins own X/Y controller) and a modulation target.
How to use:
- Load Fruity Envelope Controller in the Channel Rack.
- Select an Articulator.
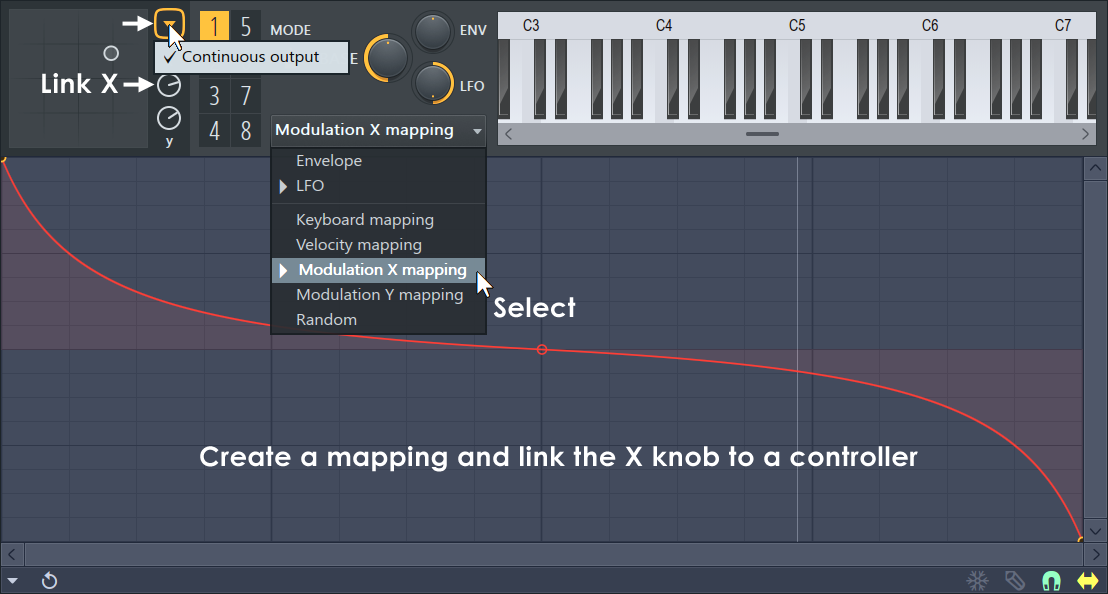
- Select Modulation X or Y mapping and create a custom envelope.
- Select 'Continuous output' from the X/Y menu if you want to control the target full-time. Otherwise X/Y modulation values be sent each time a note is played.
- Link the target Synth, Effect or interface control to the Mod X or Y source. Remember to select the Articulator used at step 1
- Link a hardware controller to control the X and or Y knob (if desired).
- Finally, move the hardware controller knob/slider and record it OR Record X/Y modulation with a mouse/touch directly on the Fruity Keyboard Controller plugin OR link the Fruity Envelope Controller X/Y knob to another internal controller.
NOTE: Envelopes can be made into complex shapes. For example, a 'stepped' envelope (use the 'Hold' option on the control-point right-click menu), will convert a controller into a single or multi-stage 'switch'.
Random
Outputs a random value under envelope control. Each time a note is triggered a random value between 0 and 1 (along the horizontal axis) is generated. A corresponding output modulation value is selected according to the vertical position at that point. In this way the vertical range of the envelope sets randomization range and area under the envelope probability that an output value will be generated.
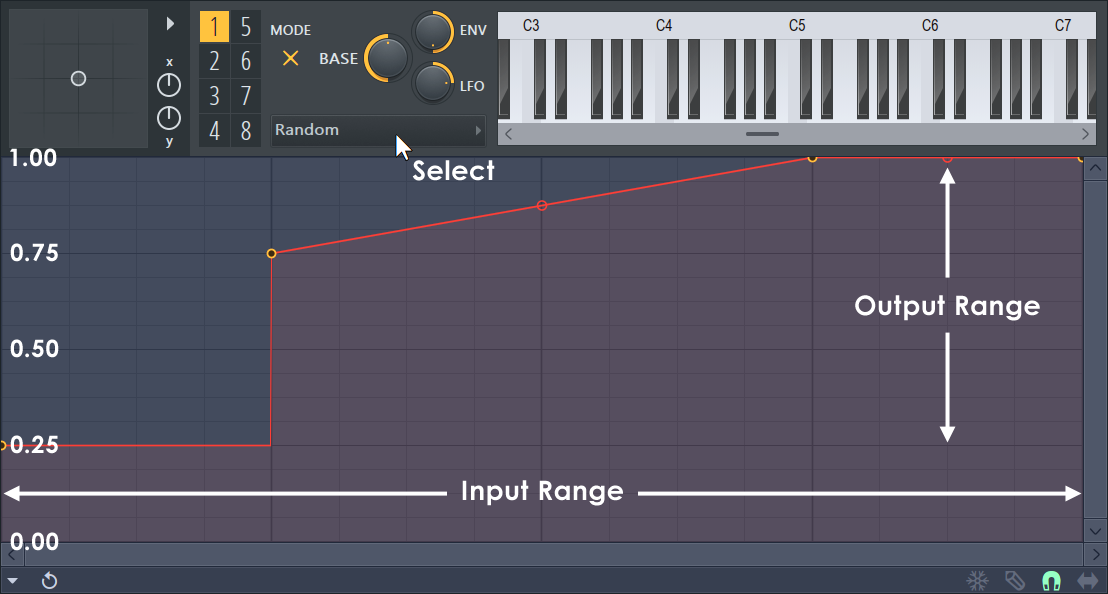
Don't glaze over, here's an example the envelope above will generate random output values between 0.25 and 1.0, notice the output values on the left side. 25% of the time the output value will be 0.25 as 1/4 of the envelope is fixed at 0.25. 50% of the time the value will be between 0.75 and 1.0 and the remaining 25% of the time the value will be 1.0 as 1/4 of the envelope is fixed at 1.0. Mathematically probability comes down to areas under the curve, for each output value. If you want simple random numbers between 0 and 1 then create a straight-line envelope from the bottom left corner to the top right.
How to use:
- Load Fruity Envelope Controller in the Channel Rack.
- Select an Articulator.
- Link the target Synth, Effect or interface control to the parent Articulator chosen at step 1. The Articulator will be available from the Link Dialog > 'Link assignment' menu
- Modify the mapping envelope as desired.
- Add trigger notes to a Piano roll or play notes from a keyboard/controller to generate random values. Only note on events are used, key/note number and velocity are ignored for this control source.
Plugin Credits: Didier Dambrin, Frederic Vanmol.