MIXING & EFFECTS
Fruity Peak Controller
Fruity Peak Controller is an internal controller used to automate targets in response to the volume envelope of an input sound AND OR its own internal LFO generator. A typical use of the Peak Controller is to create 'Sidechain compression' style effects by putting Peak Controller on the kick track and use the automation signal to control (duck) the volume of other Mixer tracks, e.g. a synthesizer playing chords. NOTE: Alternatively, Fruity Limiter's compressor section has side-chain functionality.
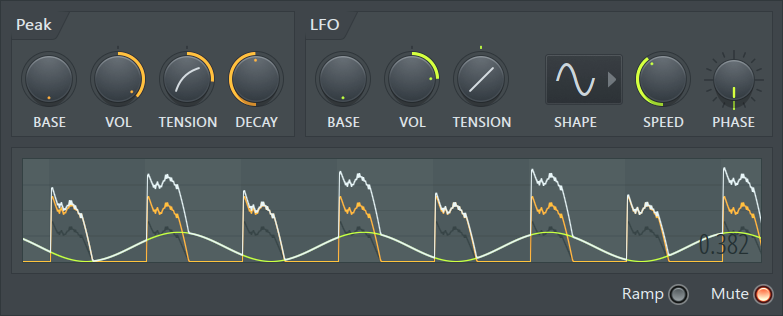
Envelope colors:
- Orange envelope - Peak automation.
- Green envelope - LFO automation.
- White envelope - Peak + LFO automation.
NOTES: 1. Hold the Vol click and hold Peak or LFO controls to see their envelopes in isolation. 2. Fruity Peak Controller will only use input signals above -50 dB.
Setup
Load the Peak Controller on the Mixer Track that has the audio signal to control the target parameter. To hear the control audio, disable the MUTE switch on the lower-right corner of the Peak Controller plugin. Peak Controller will appear as an 'Internal controller' link option in the 'Link to controller > Link assignment' Right-click link dialog. Link assignment options include:
Peak Ctrl - Peak+LFO - The combination (sum) of the above two automation signals.
Peak Ctrl - Peak - The peak control only. Automation comes from the plugins volume peaks of the input audio signal.
Peak Ctrl - LFO - The LFO controller only.
Parameters
Pay attention to the Mute switch that is on by default and prevents input audio passing through the plugin.
Peak Controls
Audio input peaks are tracked and an automation source is created according to the following options:
- Base - Base, or lowest value (offset), of the control output.
- Volume (VOL) - Maximum value of the control output. The control is bi-polar with values from -200% (maximum to left) to 200% (maximum right). When using positive values a higher volume means higher Peak Control output values. Negative volumes result in a 'ducking' effect where the Peak Controller output is negative and dips with each input peak. You will need to set this in conjunction with the Base level to create 'sidechain pumping' effects. Turn up the Base and then turn the Volume to negative.
- Tension - The shape of the attack and release curve (the controls graphic shows the effect). NOTE: As the attack of most sounds is very short you won't see or hear an effect of this parameter. It will be most useful on the decay side of the envelope.
- Decay - Time taken to decay to the 'Base' level.
Low Frequency Oscillator (LFO) Controls
The LFO runs independently of the audio input. Set according to the following options:
- Base - Base, or lowest value the LFO will output.
- Volume (VOL) - Maximum value of the LFO output. The control is bi-polar with values from -100% (maximum to left) to 100% (maximum to right). Use in conjunction with the Base value.
- Tension - Drag up and down to alter the shape of the curve used to map the LFO values to LFO controller values. You can think of tension as a multiplier for the output.
- Shape - Select the shape of the LFO waveform. Choose from sine, triangle, square, saw and random values (dice icon).
- Speed - LFO speed. Turn to left to speed up the LFO. Turn to right to slow down.
- Phase - This sets the phase offset for the LFO. This effectively controls the start-position.
Additional Options
- Ramp switch - Prevents abrupt changes in output values. Use this if the parameters you link to clicks and pops when changed too quickly.
- Mute switch - OFF the signal passes through the Fruity Peak Controller plugin. ON the output of the plugin is muted. For example, mute the output if you want to create a 'sidechain pumping' effect without the kick audio being heard.
Plugin Credits: Didier Dambrin