CHANNEL SETTINGS
Miscellaneous Channel Settings
The Miscellaneous Channel Settings page contains various generator settings and are available for all Instrument Channels, including VST/AU plugins.
NOTE: Apart from setting Root note (Right-click) and Key range, the vertical position on the keyboard previews note velocity.
Levels Adjustment
This section controls Channel:
- Panning (PAN) - Channel panning (Left to Right)
- Volume (VOL) - Channel volume.
- Modulation (MODX/MODY) - Assignable modulation parameters.
These duplicate the functionality of the other controls found in the Channel Settings window, but are useful for two main reasons: 1. Easier automation - You can, for example, create a fade in/out effect for a channel using the volume adjustment knob instead of the channel volume control. This allows you to independently set the overall volume level using the channel volume knob, without needing to recreate the automation data. Similarly, you can set the pan adjustment knob to create panning LFO without automating the channel pan knob, i.e. adjust the overall panning without recreating automation data. 2. Wider range - The volume adjustment knob has a range of 0% to 200% compared with the channel volume knob (0%-100%). Thus, you can preamp the volume up to twice as loud as the original level without needing additional effects.
Polyphony
- MAX - Drag up/down to set the Max Polyphony (MAX) to reduce the maximum number of voices the channel will play simultaneously. The purpose of this setting is primarily to lower the number of voices and so reduce CPU load. For single-voice playback use Cut Groups instead. If the LCD displays dashes, it indicates that polyphony is unrestricted. NOTES: This setting will be deactivated if 'Disable maximum polyphony' is selected on the Export Project Dialog. See the Mono option (below) for details on how a Max poly of 1 differs from Mono mode.
- SLIDE - Portamento Time (SLIDE) is used to set the slide length when portamento is turned on. Also used for overlapping notes in monophonic mode. The more the knob is turned right, the longer the slide.
- Mono - Turning on the Mono button sets the instrument to monophonic mode (maximum one note played at a time). In this mode, when two notes overlap (the overlap amount does not matter) they will 'slide' one to another (including their properties - cutoff, resonance and panning). You can set the transition length with the Portamento Time (SLIDE) knob (see below).
NOTES: Mono mode overrides the 'Max poly' option. This is important because both act differently:
- Max poly - Causes a forced 'release' of oldest notes over the poly limit. Notes stop playing immediately.
- Mono mode - Triggers the current release state of notes, so there can be some overlap.
- Porta - Turning on the Porta button enables the portamento feature for this channel (sliding the pitch from note to note). In FL Studio the portamento transition also includes all other properties of the note (cutoff, resonance and panning).
NOTES: Portamento and sliding of overlapping notes is not supported by VST/AU instruments. It may also not be supported by some Fruity Plugin instruments (those that do not support pitch bending).
Time
The main controls in this section are a Gate that 'truncate' notes when they pass the specified length and Shift + Swing that move the start time of notes.
- Gate - The time interval set with this knob defines the maximum possible length of a note event in the channel - i.e. long notes are truncated to the set length. Look in the hint bar (see Main Panel) to see the length you set in STEPS:TICKS format. To disable the gate effect turn the knob fully clockwise.
- Shift - Turn this knob to right to delay notes' triggering with up to 16-th note time period (one step).
- Swing - The Swing Mix is a multiplier knob for the Channel Rack swing control. This allows you to independently apply varying amounts of swing to channels. See 'Global Swing' for a detailed explanation of what Swing is and how to use it. NOTE: You can set Swing Mix for multiple Channels using Set swingmix for selected.
- Full porta - When Portamento notes are used selecting this will ignore the Gate time setting and play the full note length.
Velocity/Keyboard Tracking
There are two trackers, one for velocity and one for keyboard key number. The keyboard tracker "links" the note number (i.e. note pitch) to the cutoff, resonance and panning properties of notes. For example, you can set the keyboard tracker so higher notes move the cutoff frequency to a higher value. The velocity tracker works in the same way, using a note's velocity to modulate target controls.
- Vol / Key - Click Vol to set the properties for the velocity tracker and Key to set the properties for the keyboard tracker. Both trackers remain active regardless of which one is currently selected. To disable the effects of the tracker, reset the PAN, CUT, Mod X & Mod Y knobs (Right-Click a knob and select the Reset command) associated with it.
- Mod X / Mod Y - There are two destinations for the keyboard tracking modulation, Mod X and Mod Y. These can be linked to parameters in FL Studio such as a plugins filter-cutoff. The knobs are bi-polar so negative and positive tracking modulation can be generated.
- Middle value (Mid) - For both trackers there is a middle value where no offsets are generated. Higher values generate positive offsets and lower values generate negative ones. For the keyboard tracker, the middle value of a note's pitch (e.g. C5 or B3) determines the 'no-offset' point. The velocity tracker uses the note's velocity.
![]()
Example keyboard tracking. The blue note shows the MID key. Each key then generates a modulation value that can be sent to Mod X and or Mod Y.
Cut Groups
Cut groups are arbitrary numbers used to identify Instrument Channels as belonging to a Cut or Cut by group. Cut groups are used so that an instrument channel can either silence other instrument channels when it plays (Cut) or be silenced by other instrument channels (be 'Cut by').
- Cut - The current channel will silence (cut) any activity in channels that have their Cut by set to this number.
- Cut by - The current channel will be silenced (cut by) any activity that appears in channels with their Cut value set to this number.
Example: Of two channels, one has an open hi-hat sample and another a closed hi-hat sample. You want the closed hi-hat sound to stop (cut) the open sound, so that it sounds as if the hi-hat has slammed shut (open to closed hat sound).
- Set the closed hi-hat Cut group (LCD on the left) to 1 (for example) and leave the Cut By group (LCD on the right) at the default "--" .
- Set the open hi-hat sound Cut by group to "1" and leave the Cut group to the default "--".
The open hi-hat is then listening for any activity on cut group 1 and if the open hi-hat channel hears activity on Cut group 1, it will stop playing. Alternatively activity on the open hi-hat channel won't affect the closed hi-hat channel since its Cut by value is set to none "--".
Cut itself: This button causes a channel to cut itself by setting the Cut/Cut By values to the same number. FL Studio will do this automatically if you check the Cut Itself button (this can also be accessed by Right-Clicking the channel button and selecting 'Cut itself' from the pop-up menu).
NOTES:
- Step Sequencer vs Piano roll - The Cut itself (Cut 1 By 1) feature will work with Stepsequence notes but does not work with Piano roll notes. You can, however, use Piano roll activity from one Channel to cut note activity in another using the Cut/Cut by feature.
- The release envelope - The Cut function works with the note data sent to the plugin (it is not an audio function like turning down a channel volume). 'Cut' sends an all-notes 'off' (release) command to the plugin on the channel so all playing notes jump to the release phase of their envelopes. If your instrument has long release envelopes, you will still hear the notes fading out after they have been cut.
Arpeggiator
This section lets you add a real-time non-destructive arpeggio effect to the sequence of an instrument. To use the arpeggiator, select a direction from the icons in the top left corner of this section. The available options are: Off (default; turns off the arpeggiator), Up, Down, Up-Down, Up-Down (twice the lowest and highest notes), Random (selects random notes from the range and chord specified).
The arpeggiator can operate in two modes - classic arpeggiator, that uses any chords present in the channel note data, or it can use a predefined chord template. The mode is selected from the Arpeggio Chord option (see below):
- Time - Select the delay between the successive notes generated by the arpeggiator. Right-Click the knob and select Set for some time presets.
- Gate - Gates the arpeggio notes, this results in shorter notes and a more staccato sound.
- Slide - Check this option to make the arpeggiator slide between notes. This option will not work with instruments that do not support slides.
- Range - Lets you set the arpeggio range in octaves. The arpeggiated chord is transposed within the specified range to create additional notes for the effect.
- Repeat - This is dependent on the 'Range' value. It determines how many times a note or arpeggio chord is repeated prior to playing in a different octave range.
- Chord - Select None if you want the arpeggiator to progress with a step of 12 semitones (1 octave) within the specified octave range. Select Auto or Auto (sustain) to set the arpeggiator in classic mode - it will create arpeggio effects based on any chords contained in the instrument sequence. The remaining presets are predefined chords that will be applied to the instrument sequence (sequence chords will not be arpeggiated as in classic mode). Auto (sustain) will not apply arpeggio effect on monophonic sequences (given that the octave range is set to 1)
Echo Delay
This section creates echoes for the channel based on echoing note events (rather than audio). This enables some special effects like pitch shifted echoes, but also requires additional CPU power for each echo generated (each echo is a normal note voice). If you want to use a standard audio-effect, use the Fruity Delay effect instead (see Effects).
All options described below are applied additive to each successive echo. For example, if you set the pitch knob to +10 cents, the first echo will have 10 cents higher pitch than the original sound. The second will have 20 cents higher pitch than the original sound, etc.
- Feedback (FEED) - Sets the volume of echoes. If this knob is centered, echoes have the same volume as the original note. Turning it to left creates fading out echoes. Turning it to right increases the volume of each successive echo. Turning this knob to the leftmost point turns echo delay off.
- Pan - Sets the panning of echoes.
- Cutoff (MODX) - Sets the filter cutoff value of the echoes.
- Resonance (MODY) - Sets the resonance value of the echoes.
- Pitch - Sets the pitch offset of echoes.
- Time - Sets the delay period between echoes in units of beats. This enables you to set a tempo based delay, so echo will follow properly tempo changes in the song.
- Number of Echoes (# ECH) - Sets the number of echoes generated for each note. It is recommended to keep this number down for lower CPU usage.
- Ping Pong - If turned on, the pan value will "bounce" when it reaches 100% left or right panning.
- Fat Mode - This is a special mode of the echo delay effect, which makes subtler echoes with alternating panning. It's useful for creating flange and chorus-like effects (similar to Unison). If this option is turned OFF, some options in the echo delay section are reset to default to avoid the sound becoming too loud.
NOTE: If you click the small arrow at the top left of this panel you can access some presets for this section.
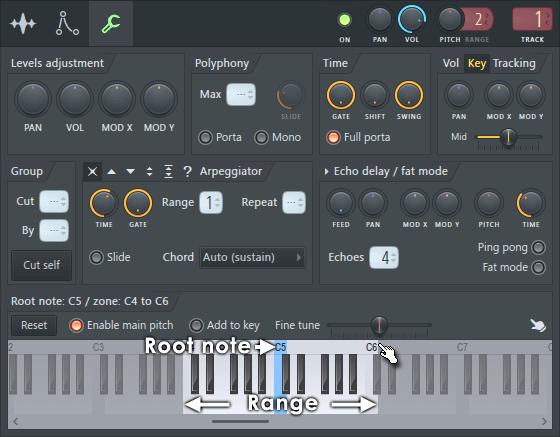
Preview Keyboard (Root note: & Zone:)
The preview keyboard allows you to preview the channel instrument (Left-clicking on the piano-keyboard), set the root key (Right-Click a key), and set key region (Left-click and drag on the ruler). NOTE: The vertical position you click will also change velocity preview.
- Reset - Sets back the default base note and removes the key region (all notes will be played). For the Sampler & DrumSynth that is C5. For SimSynth it depends on how the preset was set in SimSynth.
- Enable Main Pitch - When selected, the Channel will respond to the Main Pitch control.
- Add to Key - Determines how the Root Key offset and Main Pitch affects multi-sampled instruments, where more than one sample is spread across the keyboard (e.g. FPC, DirectWave, Fruity Slicer, Slicex etc.). Plugins with single-samples stretched across the keyboard and synthesizers are not affected by this option.
- ON - Root key transposes note input (use this option to transpose live MIDI keyboard playing). The Root Key offset transposes the MIDI keyboard input to the instrument so if you play C5 with a 'Root key' offset of +4 semitones the instrument will receive instructions to play G#4.
- OFF - Root Key transposes source samples. The Root Key offset will re-pitch samples used in the instrument by the offset amount. This will sound bad with most multi-sampled instruments.
- Sampler & SimSynth/DrumSynth - (not shown) These buttons appear only in Sampler instrument, when SimSynth or DrumSynth preset is used to fill the sample bank in Sampler Channel Settings. If the Sampler button is clicked, the base note you set in preview keyboard is used as usual by the Sampler as a base tone of the sample (in this case the sample generated by the SimSynth/DrumSynth preset). When the SimSynth/DrumSynth button is clicked, the base note is used by the SimSynth or DrumSynth engines respectively for a pitch of the sample generated.
- Fine tuning (FINE) - You can use this knob to fine-tune the base note in cents (1 cent = 1/100th of a semitone).
- Root Key - The default Root Key is C5. The blue note (C5 in the example above) shows the root key of the channel. Right-Click a note to change the setting. As each sample has an original pitch, FL Studio needs to know what key should play at this pitch. All other pitches are generated by changing sample's speed (and so pitch) or using Pitch Shifting, setting the root key higher will cause a given key to sound lower in pitch. NOTE: You can use this feature to change key of your MIDI controller (with sample based instruments make sure Add to key is also selected, see above).
- Key Region - The lighter region shows the playable note-range. Left-click and drag on the keyboard to define the key region. Once created, edit the region limits by dragging the end points. Setting a key region for a channel will cause notes outside the region to be ignored (so not played). This can be useful when using a channel as part of a Layer, to create multi-sampled instruments (e.g. selecting a different sample to play over each octave).
- Multi-touch - Enlarges the keyboard for use with multi-touch displays and your fat fingers.
- Fine - Fine-tune the pitch in cents (1/100ths of semitone).