INSTALLING PLUGINS
Installing Plugins
This page provides step by step instruction on installing VST/AU instruments and effects. The following topics are covered:
- How to install VST / AU plugins - Instruments & effects.
- About 32 vs 64 Bit VST plugins - Please read this section.
- Audio Unit (AU) plugins - A macOS only format.
- VST/AU folders - More detail about where VST/AU plugins are installed on your computer.
- macOS Apple Silicon plugins - Important note for Mac users about plugins under Apple Silicon vs Rosetta 2.
Watch tutorial videos here ![]()
How to Install VST / AU Plugins (Instruments & Effects)
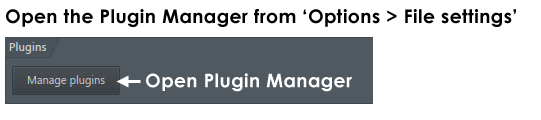
- Install the plugin - We strongly recommend you run the plugin's installer and use its default install location OR for VST/AU plugins without an installer, copy the files to the appropriate folder set in the Plugin Manager > Plugin search paths field. NOTE: The best manual method is always to install to one of the default plugin locations for your OS. Only use the Plugin Manager to add additional plugin install and search locations if you have a specific and valid reason.
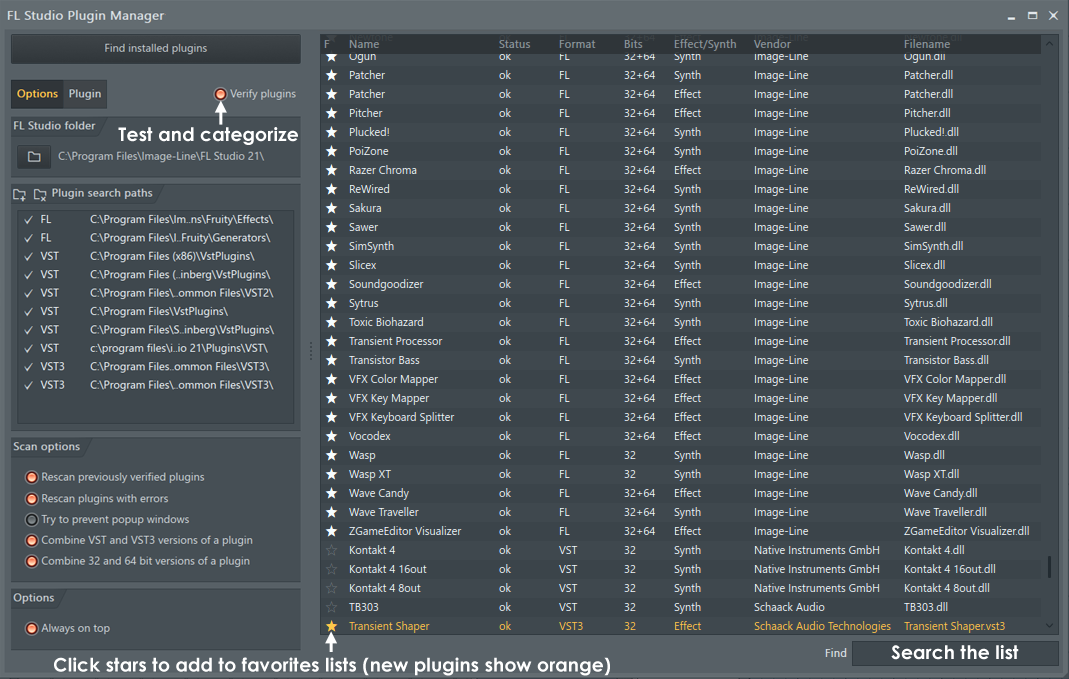
- Scan for installed plugins - After installing the plugin/s, we recommend the 'Find installed plugins + Verify plugins' option. This correctly sorts plugins into their Installed > Effects or Generators category. Verify scans ensure only the correct plugin types are shown at the various 'add plugin' locations in FL Studio. E.g. the Channel Rack > Menu > Add one option, Channel Rack + button and Main menu > Add option, FX slot menu etc. AND along with the 'Rescan previously verified plugins' option, ensures plugins are correctly identified after plugin updates.
IMPORTANT NOTES for macOS Apple Silicon CPUs and VST Plugins:
When FL Studio is used on an Apple Silicon CPU it can run in one of two modes. Native Apple Silicon or Rosetta 2. You can read about FL Studio Apple Silicon support here. In short, VST plugins developed for Intel CPUs must be run inside a process-bridge when used under Apple Silicon. Apple will handle AU format plugins and these do not need to be bridged. If FL Studio is in Rosetta 2 mode, then Apple handles both VST and AU format plugins. Below are some notes about how to proceed ...
- FL Studio Apple Silicon - If you are using FL Studio in native Apple Silicon mode, Intel VST plugins will be automatically bridged by FL Studio. AU Intel plugins will be handled by macOS and appear as if they were native Apple Silicon.
- FL Studio Rosetta 2 - If you are running FL Studio under Rosetta 2 Apple will handle VST and AU Intel plugins. FL Studio won't bridge any plugins.
- Mixing Plugin Runtime Formats - Bridging VST plugins can use more CPU than using FL Studio under Rosetta 2 mode with Intel VST Plugins. Bridged plugins will almost certainly use more CPU than their Apple Silicon version (if it is available).
- Changing FL Studio Runtime Mode - You can set FL Studio to start in Apple Silicon or Rosetta 2 mode by following the procedure here.
- macOS <> Windows Project Compatibility - If you want to share projects with Windows installations and you are using 3rd party plugins, you must use VST format since this is the only way to maintain cross-platform project compatibility.
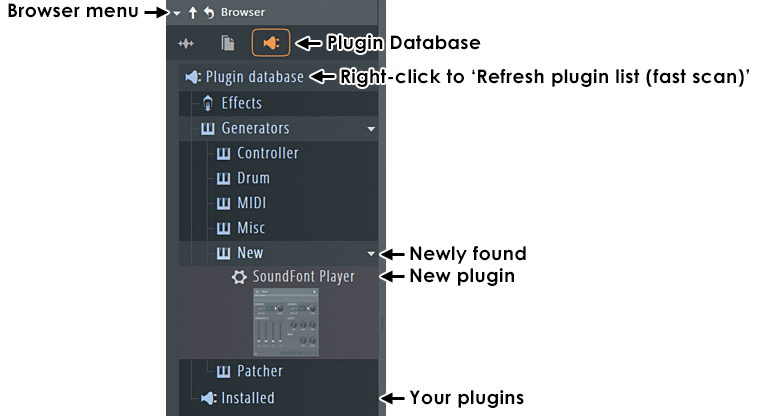
- Where can I find my new plugins? - Newly scanned plugins will appear under your Browser in Plugin database > Installed > Effects > New and Generators > New. Whether or not they are correctly classified as Generators or Effects will depend on whether you ran a Verify plugins (Yes) or Fast scan (No, both Generators/Instruments and Effects will be in both categories). The plugin will also be in the VST, VST3 or Audio Units sub-folder, depending on its type.
- Making favorites - Add your plugins to your 'Favorites' list the Plugin Database, the Effect and Generator folders above the Installed folder. This will allow you to add the plugin to projects from the standard locations as mentioned above (see point 2 above):
- Prepare the plugin - Configure the plugin with the default preset you prefer and any wrapper settings (e.g. Scaling options) before creating a favorite. This will ensure the plugin will always load in the preferred state.
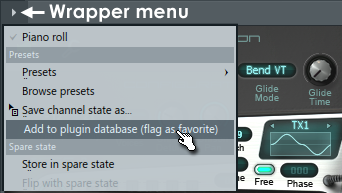
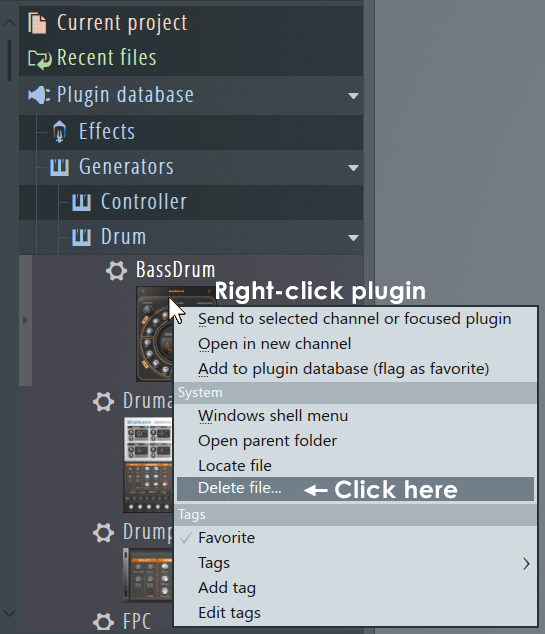
- To categorize a plugin (generator/effect) - This will 'favorite' it, available from the standard locations as mentioned above. Open the Browser > Plugin database > Generators or Effects to the sub-folder where you would like to add the plugin and select 'Add to plugin database (flag as favorite)' from the plugin wrapper menu (shown below).
NOTES:
- Alternatively you can 'favorite' plugins from a list using the Plugin manager tool OR anywhere you see the 'More plugins...' option in menus. Use this if you are not interested in creating plugin thumbnails.
- The plugin database is a standard folder on your disk so feel free to reorganize and or create/delete categories using any file manager (right-click 'Plugin database' category in the Browser and select 'Open').
- Adding plugins as favorites is a separate feature from adding the favorite tag in the Browser (starring), which will move the starred item into the 'Starred' Tab.
- Removing plugins from the database - From the database right-click it in the Browser and select 'Delete file...' from the pop-up menu. NOTE: This does not delete the plugin
from your disk, it only removes the database entry.
- Using the plugin - Now the plugin is installed and can be used as a standard FL Studio instrument or effect.
- Creating and managing 'favorite' lists - See here for creating and managing favorites. Favorite plugins will show in drop-down menus and the Plugin picker.
Related Links:
- Installed instruments - Learn more about instruments (generators) pre-installed in FL Studio.
- Installed effects - Learn more about the effects pre-installed in FL Studio.
- Plugin standards - Learn more about the plugin standards supported by FL Studio.
What Plugin Types Are Supported & Where Are They Located?
Virtual Studio Technology (VST) Plugins (Windows and macOS)
VST is a software interface standard that allows you to load VST software synthesizer and effect 'plugins' in FL Studio. VST is in addition to the FL Studio 'native' plugin format. VST plugins generally come in two types, instruments (VSTi) that are designed to make sound and effects (VST) that are designed to process sound, although some can do both. FL Studio categorizes VST instruments as 'Generators' because some also generate control or note data, rather than sound. VSTs are self-contained programs that 'plug-in' to FL Studio giving you access to a, virtually unlimited, source of new instruments and effects.
NOTE: VST format plugins for Windows and macOS are not compatible. Use the correct Windows or macOS installer for your operating system of choice. It is common to find free VST plugins with Windows but no macOS version.
Important notes about 32 vs 64 Bit, GUI Scaling & Plugin Names
The computer music industry has almost completed the process of changing from 32 to 64 Bit software. This has made things a little complicated, what's new :)
- Plugin compatibility - Just as FL Studio used to be available in both 32 and 64 Bit versions, VST plugins can also come in 32 or 64 Bit format. The bit-depth of plugins determines how much memory the plugin can access. It has nothing to do with 'audio quality'. A version mismatch between FL Studio and a plugin can be solved with a process called bridging. FL Studio for macOS only supports 64 Bit plugins however, no bridging. We STRONGLY RECOMMEND using 64 Bit plugins in any recent versions of FL Studio, which have been 64 bit only since version 20.9. On Windows, if you load 64 Bit plugins in FL Studio 32 Bit or 32 Bit plugins in FL Studio 64 Bit, a 'bit bridge' will automatically be used. Bridging consumes about 2% extra CPU, per plugin. Certainly, a few bridged plugins won't normally matter, but bridging 10 or more plugins definitely will waste CPU capacity. Bridging is automatic, you don't need to do anything special to make it happen, one reason to pay attention to what plugins you are using. The Wrapper Settings Tab will show if a plugin is bridged and its Bit version. NOTE: You can install both 32 and 64 Bit versions of a plugin, if available. Many older, free VST plugins you can find online, are only available in 32 Bit.
- Project compatibility - You can load projects made with FL Studio 32 Bit in FL Studio 64 Bit and vice versa. When you load a FL Studio 32 Bit project in FL Studio 64 Bit, all plugins are automatically loaded with 64 Bit versions, if the 64 Bit version exists. When loading 64 Bit projects in the FL Studio 32 Bit the reverse is also true, FL Studio will try to find 32 Bit versions of all plugins. If the bit-equivalent plugin is not available, then the bit-original plugin is loaded and bridged (see the point above). NOTE: Even though the above is true, if you're still using a 32 bit version of FL Studio and attempt to open a project made in a 64 bit version, it is likely the project will not be compatible due to being created in a version that is newer, as the last 32 bit version is getting increasingly outdated. Projects created or saved in newer versions of FL Studio may not be compatible with older versions due to new features.
- More Bit related information - Click here to see the FL Studio 32 vs 64 Bit FAQ online.
- VST GUI Scaling - High resolution monitors will shrink VST plugin interfaces. See the section on Rescaling VST Plugins to fix this. NOTE: Native plugins use a different scaling system, see here.
- VST plugin names - Unless you set the File Settings > Manage plugins > Verify plugins switch, FL Studio will perform a 'fast scan'. Fast scans only identify plugins by the name of the VST's .dll file (which is the VST plugin). If the plugin name is changed, either by you or the manufacturer, FL Studio won't find it when loading projects using the plugin. The Verify plugins option gathers unique identification codes for each plugin that allows FL Studio load plugins even if the file name has been changed. In addition, the Verify plugins scan identifies plugins as Generators (Instruments) or Effects, simplifying plugin management, so we strongly recommend you use the Verify plugins setting.
Audio Units (macOS only)
Audio Units (AU) are an Apple standard tied to Core Audio and so only compatible with FL Studio for macOS. AU is Apple's equivalent to VST. As there are many similarities between the two standards, you can usually find both macOS AU and VST versions of plugins.
Some points to consider:
- Sharing projects - If you are sharing projects with Windows users, you must use the VST versions of your 3rd party plugins. This will maximize compatibility between projects since the AU versions of plugins will not be matched with the VST equivalent. VST plugins on macOS will be matched with VST plugins on Windows. Running FL Studio in Apple Silicon mode adds some further things to consider when using VST Plugins. See here.
- 64 Bit only - FL Studio for macOS is only compatible with 64 Bit AU and VST plugins. There is no automatic bridging as there is with VST on Windows. See here why we did not support 32 Bit on macOS.
- AU vs VST - We recommend using the VST version of plugins, when available, on macOS. There are two reasons; 1. This will ensure Mac/Windows compatibility when sharing projects. AU plugins do not use the same naming conventions and so FL Studio won't be able to match a VST and AU plugin when loading projects. 2. Most 3rd party developers create VST plugins, then add an additional layer of code to provide AU compatibility. This means VST plugins may have slightly less processing overhead compared to their AU counterparts. However, you if you have problems with either format try the alternative AU or VST instead, and check the relative CPU usage also.
- AU & VST locations - If your plugin's are installed to the default macOS locations, all you need to do is a 'Verify plugins' scan to access them in FL Studio.
- MIDI out - AU does not support MIDI output.
Plugin Default Locations
If you use the plugins default installer you should not need to worry about the information below. FL Studio will find your plugin in one of the following default locations. This information is provided for installing legacy plugins, without an installer. Choose the appropriate folder based on its VST / AU specification.
NOTE: If a plugin is not located, make sure you have selected 'Verify plugins' and 'Rescan previously verified plugins' in addition to installing the plugin to one of the default locations below. DO NOT install plugins to the FL Studio installation folder (...\Image-Line\FL Studio\Plugins\VST). This is a special folder for legacy native FL Studio plugins.
Windows
VST 1 and 2 Plugins (.dll):
- The '..\Program Files\Common Files\VST2' (64 Bit plugins on a 64 Bit Windows only).
- The folders set as the Extra search path in the Plugin manager (32 Bit plugins).
VST 3 Plugins (.vst3): - NOTE: VST3 plugins must be installed to the exact locations shown below, otherwise they will not be found during a scan.
- The '..\Program Files\Common Files\VST3' & '..\Program Files\VST3' folders (32 Bit plugins on 32 Bit Windows OR 64 Bit plugins on 64 Bit Windows).
- The '..\Program Files (x86)\Common Files\VST3' & '..\Program Files (x86)\VST3' folders (32 Bit plugins on Win 64 Bit Windows).
macOS
VST 2 plugins (.vst):
- [Macintosh HD]/Library/Audio/Plug-Ins/VST
- [Macintosh HD]/Users/Username/Library/Audio/Plug-Ins/VST (rarely used)
NOTE: The /User/Library is hidden by default.
VST 3 Plugins (.vst3):
- [Macintosh HD]/Library/Audio/Plug-ins/VST and Library/Audio/Plug-ins/VST3
- [Macintosh HD]/Users/Username/Library/Audio/Plug-Ins/VST3 (rarely used)
NOTE: The /User/Library is hidden by default.
Audio Unit Plugins (.au):
- [Macintosh HD]/Library/Audio/Plug-Ins/Components/
Custom VST/AU Folders:
- You can set custom VST/AU search folders from the 'Plugin manager > Plugin search paths' field. Normally this would be used for VST 1 and 2 format plugins, without a factory installer.
NOTE: If you install VST and AU plugins to their default locations, FL Studio will find them automatically!